The Devil is in the Details

September 23, 2008

I hate to admit it, but I have always been disappointed with so-called Devil’s Food Cake. When you hear that name, you (or at least I) think of something thick and evil, rich and seductive; and more often than not, Devil’s Food Cake is just plain ol’ chocolate cake. Nothing really special.

This cake, however, though it goes by another name, is exactly what a devil’s food cake should be. It’s just so incredibly evil. The kind of thing you just can’t stop eating even though you know you really should. It calls your name in the middle of the night and smugly tempts you to forget any diet you might have been considering. And with a thick layer of ganache on top, it’s well worth every pound you might gain.

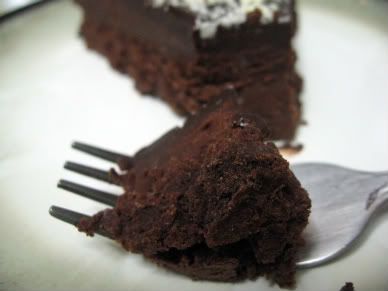
I have wanted to make this flourless cake for a while now and I gotta say, it’s well worth the wait. It came out even better than I dared hope, and considering just how beautiful this thing is, it’s perfect for any and every occasion.

Flourless Chocolate Cake
a.k.a.: The Devil Made Me Do It Cake
Source:
The Boston Globe

12 ounces bittersweet chocolate, coarsely chopped
11 tablespoons (1 stick plus 3 tablespoons) unsalted butter
1/2 teaspoon vanilla extract
4 eggs, at room temperature
1/2 cup granulated sugar

Ganache:
Source:
Joy of Baking

8 ounces chocolate, finely chopped
3/4 cup heavy whipping cream
2 tablespoons unsalted butter
1 tablespoon chocolate liqueur

Preheat oven to 350F

Butter a 9-inch springform pan with removable sides. Line the bottom with a round of parchment paper cut to fit it exactly. Butter the parchment. Line the outside of the pan with a double-thickness of foil, pressing the foil onto the sides.

In a heatproof bowl set over a saucepan of hot, but not boiling, water, combine the chocolate and butter. Heat, stirring constantly, just until the chocolate melts. Remove the bowl from the pan and wipe the bottom with a clean cloth. Stir in the vanilla and set it aside to cool slightly.

With an electric mixer, beat the eggs and sugar at high speed for 8 minutes or until thick and pale yellow.

Fold one-third of the egg mixture into the melted chocolate to lighten it. Then fold the remaining egg mixture into the chocolate as lightly as possible until no yellow patches show.

Pour the batter into the prepared pan and set the pan in the center of a large roasting pan. Pour enough hot tap water into the roasting pan to come about one-third of the way up the side of the cake pan. Carefully place the roasting pan in the middle of the oven. Bake 43 to 45 minutes or until the top of the cake is set with a firm crust, but the inside is still moist.

Carefully remove the roasting pan from the oven. Lift the pan out of the water carefully, run a thin knife around the edge of the cake, remove the foil from the pan then set the cake in the pan on a rack to cool completely. Don’t release the sides.

Cover the pan with a clean piece of foil and chill for at least 4 hours or overnight.

Remove the cake from the refrigerator. Release the spring on the pan and remove the ring. Invert the cake onto a flat plate or cookie sheet. Insert a narrow metal spatula knife between the bottom of the pan and the parchment paper, moving it just enough to release the bottom of the pan. Peel off the parchment. Invert the cake back onto the bottom of the pan.

Brush any loose crumbs from the cake and place cake on a wire rack again.  Put the wire rack on a baking sheet to catch any of the ganache that will drip off. 

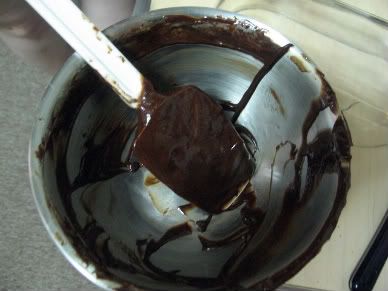
Place the chopped chocolate for the ganache in a medium sized stainless steel bowl. Set aside. Heat the cream and butter in a medium sized saucepan over medium heat. Bring just to a boil. Immediately pour the cream over the chocolate and allow to stand for 5 minutes. Stir with a whisk until smooth. If desired, add the liqueur.

Using a cake spatula, cover the sides and top of the cake with about 2 tablespoons of the ganache. Refrigerate cake for 5 minutes to set the crumb coat. 

Pour the remaining ganache into the center of the cake. Working quickly, spread with a spatula, using big strokes to push the ganache over the sides of the cake, to create an even coating. If there are any bare spots on sides of cake, cover with leftover ganache.

Decorate as desired. Refrigerate until ready to serve. Enjoy.


The Best Days of Our Lives

September 19, 2008

Regardless of whether you are 3 or 63, summer is almost always a wonderful time of the year. Long vacations, visits to the beach, picnics, sitting out on the porch, barbecues, tons of ice cream and milkshakes…

Unfortunately we can’t enjoy all of those things year round, but ice cream is the kind of treat you can devour as often as you want. This is the first summer that I have been a blogger, so I was surprised by how many bloggers actually made homemade ice cream….and of course, I was very tempted to do it myself.

It took me awhile, and the influence of a dear newcomer in my life who loves ice cream even more than I do, but even though summer is quickly coming to an end, I have finally made this incredible tasty treat.

The best thing about this recipe, is it does not require an ice cream maker. YOU are the ice cream maker so anyone like myself, who has not yet invested in one of these can make it.

Vanilla Ice Cream
Source: David Lebovitz

1 cup milk
A pinch of salt
3/4 cups sugar
1 vanilla bean
5 egg yolks
2 cup heavy cream
A few drops of vanilla extract

Heat the milk, salt, and sugar in a saucepan. Split the vanilla bean lengthwise and scrape the seeds into the milk with the tip of a paring knife. Add the bean pod to the milk.

Stir together the egg yolks in a bowl and gradually add some of the warmed milk, stirring constantly as you pour. Pour the warmed yolks back into the saucepan.

Cook over low heat, stirring constantly and scraping the bottom with a heat-resistant spatula until the custard thickens enough to coat the spatula. Strain the custard into the heavy cream. Rinse the vanilla bean and put it back into the custard and cream to continue steeping. Pour into a deep baking dish, or bowl made of plastic, stainless steel or something durable and chill over an ice bath.

After forty-five minutes, open the freezer and check it. As it starts to freeze near the edges, remove it from the freezer and stir it vigorously with a beater, spatula or whisk. Really beat it up and break up any frozen sections. Return to freezer. Continue to check the mixture every 30 minutes, stirring vigorously as it’s freezing.

Keep checking on your ice cream and stirring while it freezes (by hand or with the electric mixer) until the ice cream is frozen. It will likely take 2-3 hours to be ready.

When it reaches the desired consistency, serve as always. Enjoy.

Anyone with a machine can make this themselves, just follow this recipe and when you get to the freezing process, finish up with the machine.

Hope you have enjoyed your summer as much as I have, and have treated yourself to plenty of ice cream.  Don’t forget, even if it’s snowing outside you can still enjoy this treat and think of past summers 🙂


Let’s Do the Twist

September 18, 2008

There are certain snacks that always seem to make people happy. Most of them are as happy-inducing because they have much sugar on top (hey, if a spoonful of sugar can make medicine better, why shouldn’t a cupful make everything else better? *g*)

This, however, is actually one of those snacks that is actually reasonably healthy…assuming you don’t over-do the salt and you’re not one of those weird anti-carb people…..but if you were anti carb you probably wouldn’t be reading this 🙂

These pretzles are not even remotely as good as those you can get in the city. But I don’t think it’s possible to make anything that good at home. But as soothing as it is to make any type of bread, and as fun as snacks like this tend to be, it’s another one of those I just couldn’t resist.

Soft Pretzels
Source: The Fresh Loaf

1 teaspoon instant yeast
1 tablespoon malt powder or brown sugar
2-3 cups bread flour
1 teaspoon salt
1 cup warm milk

Combine all of the ingredients in a bowl and mix together until it forms a ball. Start with 2 cups of the flour and mix it together until it forms something like a thick batter, then add more flour a handful at a time until it’ll form a nice ball that you can knead by hand.

Knead the dough for 5 to 10 minutes until it begins to get smooth and satiny. Return the ball of dough to a clean, greased bowl, cover with plastic wrap, and set it aside to rise until it has doubled in size, approximately an hour.

Preheat the oven to 425 degrees. Degas the dough gently then cut into 6 pieces. Roll each one into a short log, cover with a towel, and let the dough relax for 5 to 10 minutes. After it has relaxed you should be able to roll it out and stretch again fairly easily.

Let them relax again and then roll and stretch a third time until they are long and thin (about 15 inches long and about as big around as your index finger). They’ll nearly double in width while baking, so you should roll them out very thin.

To shape the pretzels, place a rope of dough on the work surface in front of you. Take each end in a hand, loop the dough away from you, and bring the ends back toward you, crossing them about an inch above the rope. Apply a little bit of pressure to make the loops stick together, but not too much because you don’t want then to flatten out.

Bring a pot of water to a boil. Dunk each of the pretzels into the boiling water for 5 seconds, then place them onto a baking sheet and sprinkle with salt or other toppings.

Place the baking sheet into the oven and bake about 15 minutes or until golden brown.

Remove from the oven and eat immediately. Enjoy.


Cupcakes Outside the Comfort Zone

September 17, 2008

I have mentioned that I am a picky eater. I know that I can be a little ridiculous with it sometimes, but it isn’t really something I can control either. It’s just who I am. However, with the experimentation I am doing with this blog, I want to step outside of that comfort zone and get a little daring. (Keep in mind something daring for me will probably be normal for most bakers).

It’s probably a little ironic to use something as comforting as cupcakes (which bring up happy icing-covered memories) for something like this but the end result sounded great so I thought it would be a good idea to just dive in.

At this point you’re probably asking yourself what it is about this recipe that is so daring. It’s actually not one, but two things: mayonnaise and sour cream. The mayonnaise because of an incident when I was a kid making sandwiches with mom and tasted from the wrong knife….and the sour cream because of my great aversion to anything with the word “sour” (it took much googling to convince myself that the tart I made a couple months ago wouldn’t actually be “tart.”) I am sure there is a deeper meaning to that one too but I really don’t need to know all the varying depths of my insanity. 😉

Anyways, this recipe marries the wonderful goodness that is chocolate with two things I have taken great pains to avoid in the past, and thank god it turned out well. I also had a new and very enthusiastic helper, who ended up wearing almost as much chocolate as we put in this, so I was too busy enjoying the company, the chocolate, and the scent of these to-die-for cupcakes to really worry about the end result. Which, by the way, really did turn out incredible. 🙂

Mint Cupcakes
Slightly adapted from: The Reckless Chef

2 cups sugar
1 3/4 cups flour
3/4 cup cocoa powder
3 oz chocolate, finely chopped
1 1/2 teaspoons baking powder
1 1/2 teaspoons baking soda
1 teaspoon salt
3 eggs
3/4 cup milk
1/3 cup vegetable oil
1 teaspoon vanilla extract
2 teaspoons mint extract
2/3 cup water
2 tablespoons mayonnaise
1 tablespoon sour cream

Preheat oven to 350.

Mix your dry ingredients in a large mixing bowl. Add the eggs, oil, milk, and water and fold them into the mix with a fork. Add mayonnaise, sour cream, and vanilla, and beat the mixture on low-speed. Add in the mint extract, and if the batter smells like plain chocolate instead of mint chocolate, add a bit more. Blend until the dry ingredients are no longer dry, and you have a consistent texture throughout.

Melt the 3 oz of chocolate in a double boiler then mix well into the batter.

Put cupcake papers into your cupcake pan. Pour batter into each cupcake paper, being as generous as you want. These raise decently but it’s always more fun if they come out as monster cupcakes.

Bake the cupcakes for 17 minutes, and test for doneness at any point after that. When a toothpick stuck in the middle of the biggest cupcake in the batch comes out clean, take them out of the oven and let them cool for a few minutes before removing from the cupcake pan.

Decorate as desired and enjoy 🙂

These are really amazing cupcakes. Perfectly moist and the mint chocolate is just irresistable. The kind of thing you can impress everyone with…if you can bear to part with any of them. 🙂


Call Off The Dogs

September 13, 2008

Hey everyone. Assuming people are still out there.

I’ve been a very lazy blogger lately; I’ve been spending a lot of time with someone pretty great lately, but I want to assure you all that I have been baking, and taking pictures. I have a bunch of catch-up posts that I need to put up here, but first I wanted to just put up with little teaser.

I will be blogging about all of these in the very near future, so hopefully they will entice you to not give up on me yet 🙂

I hope all of these have peaked your interest, because I will be back soon with much more details 🙂