Some of the Best Things in Life are Easy!

March 6, 2009

I think I have run into a slight problem. You see, I love homemade bread, as I have mentioned here many times (maybe too many), and whenever I have some in the house I tend to eat more than I should.

The good thing is that it tends to take so much time out of the day that I can only make it once or twice a month, so those extra calories don’t make it into my system that often.

The problem, is that I have run into a solution to that. That sentence just sounds wrong, but anyways, I managed to get my hands on a copy of Artisan Bread in Five Minutes a Day by Jeff Hertzberg and Zoe Francois.

This bread is amazing. Not only is it just as easy as it sounds, but the depth of flavor is incredible. This means that I can have fresh bread any day I want. Isn’t that horrible? 😉

This also means that all of you out there who have been hesitant to try making bread can take that leap and be assured you’ll have great bread without even trying! Don’t be afraid of the length of the recipe. Even though I edited it down a lot it’s still a bit wordy, but the actual process isn’t any more difficult than making cookies 🙂

Boule (Artisan Free-Form Loaf)
Source: Artisan Bread in Five Minutes a Day

3 cups lukewarm water
1 1/2 tablespoons instant yeast
1 1/2 tablespoons salt
6  1/2 cups unsifted, unbleached, all-purpose flour

Mixing and Storing the Dough:

Warm the water slightly: It should feel just a little warmer than body temperature, about 100 F. Warm water will rise the dough to the right point for storage in about 2 hours.  Add yeast and salt to the water in a 5-quart bowl or, preferably, in a resealable, lidded (not airtight) plastic food container. Don’t worry about getting it all to dissolve.

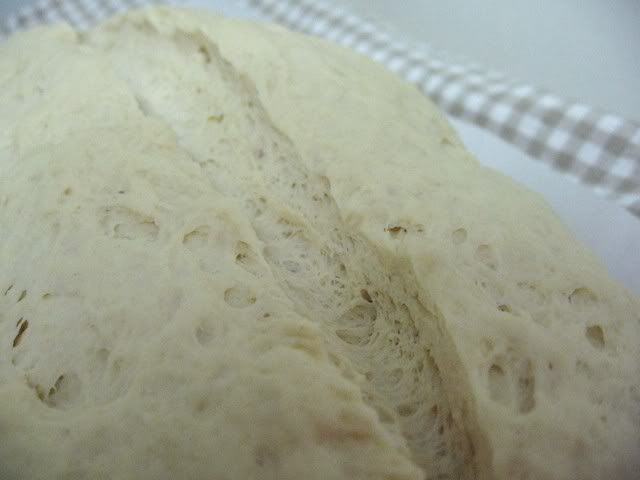
Mix in the flour but do not knead. Add all of the flour at once by gently scooping up flour, then sweeping the top level with a knife or spatula; don’t press down into the flour as you scoop or you’ll throw off the measurement by compressing. Mix with a wooden spoon until the mixture is uniform. If you’re hand-mixing and it becomes too difficult to incorporate all the flour with the spoon, you can reach in with very wet hands and press the mixture together. Don’t knead! It isn’t necessary. You’re finished when everything is uniformly moist, without dry patches. This step is done in a matter of minutes, and will yield a dough that is wet and loose enough to conform to the shape of its container.

Cover with a lid (not airtight). Do not use screw-topped bottles or Mason jars, which could explode from the trapped gases. Allow the mixture to rise at room temperature until it begins to collapse (or at least flattens on the top), approximately 2 hours, depending on the room’s temperature and the initial water temperature. Longer rising times, up to about 5 hours, will not harm the result. You can use a portion of the dough any time after this period. Fully refrigerated wet dough is less sticky and is easier to work with than dough at room temperature. So, the first time you try our method, it’s best to refrigerate the dough overnight (or at least 3 hours) before shaping a loaf.

On Baking Day:

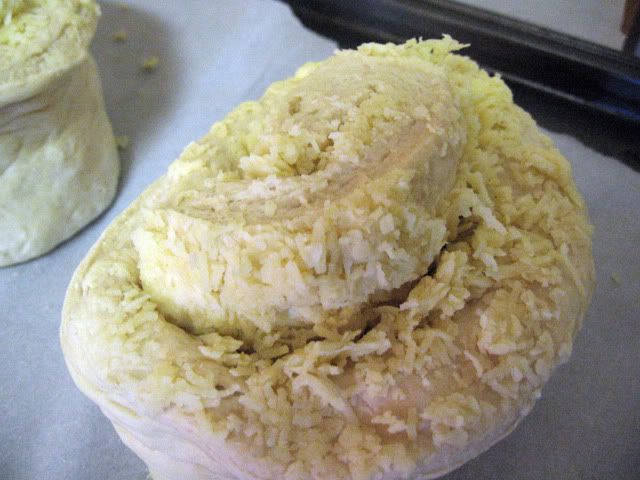
Sprinkle the surface of your refrigerated dough with flour. Pull up and cut off a 1-pound (grapefruit-size) piece of dough*, using a serrated knife.

Hold the mass of dough in your hands and add a little more flour as needed so it won’t stick to your hands. Gently stretch the surface of the dough around to the bottom on all four sides, rotating the ball a quarter-turn as you go. Most of the dusting flour will fall off; it’s not intended to be incorporated into the dough. The bottom of the loaf may appear to be a collection of bunched ends, but it will flatten out and adhere during resting and baking. The correctly shaped final product will be smooth and cohesive. The entire process should take no longer than 30 to 60 seconds.

Place the shaped ball on a piece of parchment paper on a cookie sheet. Allow the loaf to rest on the peel for about 40 minutes (it doesn’t need to be covered during the rest period). Depending on the age of the dough, you may not see much rise during this period; more rising will occur during baking.

Twenty minutes before baking, preheat the oven to 450F.

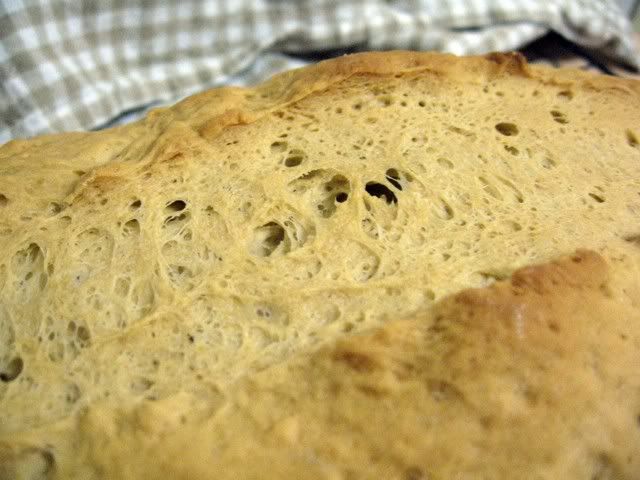
Dust the top of the loaf liberally with flour. Slash the top as desired, about 1/4-inch-deep.

After a 20-minute preheat, you’re ready to bake, even though your oven thermometer won’t yet be up to full temperature. Place the loaf on the sheet in the oven. Quickly but carefully through ice cubes in the oven and close the oven door to trap the steam. Bake for about 30 minutes, or until the crust is nicely browned and a thermometer inserted inside reads 200F.

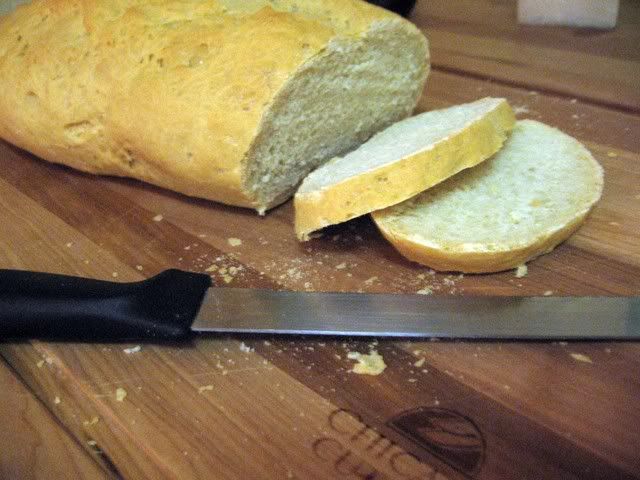
Allow to cool completely, preferably on a wire rack, for best flavor, texture, and slicing. The perfect crust may initially soften, but will firm up again when cooled. Enjoy!

You can store the remaining dough in your refrigerator in your lidded (not airtight) container and use it over the next 14 days. You’ll find that even one day’s storage improves the flavor and texture of your bread. Cut off and shape more loaves as you need them. The dough can also be frozen in 1-pound portions in an airtight container and defrosted overnight in the refrigerator prior to baking day.

*The recipe states that you can have four loaves with this bread, but with two of us 1/4 of that dough really wasn’t enough. I think 1/2 is really more appropriate. And the longer you leave the dough, the more the flavor will develop, just make sure you don’t leave it past 10-14 days or it just won’t be as good.


A Challah to Remember

January 20, 2009

One of the fun things of being a girl is dreaming of the man that might show up in your life one day. Though reality is not even remotely close, you can have an interesting journey through your imagination with that dark, daring stranger that will sweep you off your feet, take you from your dull life to strange and interesting new worlds or…as in the “story” I apparently wrote when I was very, very young…rescue the princess from the evil ogre holding her hostage. 🙂

Every girls dream is different is some way, and the man we are each ultimately the happiest with is completely different from the man that would make our best friends happy. But along that very long and often trecheours road to happiness I think all women at one point will take a fantasy detour to dream about being with a man with a sexy accent. Irish, Italian, Austrialian (*insert sexy purring noise*). I honestly don’t know what it is, but the idea of someone so different and foreign can certainly make me melt like chocolate on a hot stove.

The wonderful man currently in my life is not really the sexy-foreign-accent type, though definitely sexy in his own way. He was, however, raised Jewish, and that makes for some fun conversations. Strange, made up sounding words like meshuggener and schmatte will sneak their way into every day conversations. People who kvetch and schlimazels are individuals to suddenly watch out for. And enough with the chicken soup already! 😉

One of the really yummy extras that came with my man (does anyone else think that almost makes him sound like one of those infomercial gadgets with all the cheesy extras? oops!) Anyways, one of the yummy extras that came with this man is Challah bread. Or “Chally.”

This was my first attempt at Chally, and while it wasn’t quite right, like every recipe from The Fresh Loaf, it was beautiful and delicious.

Challah Bread
Slightly adapted from: The Fresh Loaf

2 eggs
1 1/2 cups room-temperature water
1/4 cup Olive Oil
2 tbl. sugar
2 tsp. salt
2 cups all-purpose flour
2 1/2 cups bread flour
1 1/2 tsp instant yeast

Beat the eggs with about a tablespoon of the water. Put aside approximately 1/4 a cup for the egg wash and mix the remaining egg with the rest of the water.

Mix the 2 1/2 cups bread flour with the yeast and add in approximately half of the water/egg mixture. It should make a very pasty mixture. Allow to set for 20 to 30 minutes or until doubled in size. 

Mix in the remaining egg/water mixture, olive oil, sugar and salt, then gradually work in the remaining flour. Place in a well greased bowl, cover and let rise for an hour or until doubled in size.

Remove from bowl, degas, and then cover and let it rise again. Preheat the oven at 400F.

Degas the dough again a let rest 15 minutes. Cut into three equal ropes sections and roll out gently to about 14 inches. Braid carefully, tucking the ends under and brush with egg wash. Let rise about 1 hour.

Brush again with egg wash. Bake for approximately 10 minutes, turn loaf in the oven and turn the temperature to 350F and finish baking for approximately 30 more minutes or until golden brown and a thermometer inserted inside reads 200F. Allow to cool completely. Enjoy 🙂

I am a little crazy, and like the three different recipes I tried to find the perfect recipe for potato bread, I have at least two more I will try to find to perfect the Challah, but this one really is awesome and well worth trying.


Giving Thanks With Bread

December 2, 2008

Sometimes it’s really hard to remember what this life actually offers that you can be thankful for. There are so many bad things in this world these days that it’s getting harder and harder to listen to the news without getting depressed. Hell, it’s getting harder to simply look at the grocery receipt without getting depressed but there are still good things out there. I personally have been lucky this year and have a few new things in my life to really be happy about but if there is nothing else, (ignoring the receipt of course) food is definitely something we can all celebrate this Thanksgiving. That is what this holiday revolves around, isn’t it?

As bread in particular has always managed to make me happy I thought this would be the perfect thing to share with everyone this Thanksgiving. It is definitely my favorite of all of the three recipes and was a hit for our big dinner.

Now, I know that I have already done not just one, but two different recipes for potato bread this year, but not only is potato bread my favorite, it also happens to be the type bread my family tends to crave for this holiday. I haven’t tried this particular recipe myself before now but I have heard many good things about it, and just couldn’t wait any longer to share.

Tender Potato Bread
Slightly adapted from: Culinary Concoctions by Peabody
A Daring Bakers Recipe

8-16 ounces of potatoes, peeled and cut into chunks.
4 cups water, reserve cooking water
1 tablespoon plus 1 teaspoon salt
2 teaspoons active dry yeast
6 ½ cups to 8 ½ cups bread flour
1 tablespoon unsalted butter, softened
1 cup all-purpose flour

Put the potatoes and 4 cups water in a sauce pan and bring to boil. Add 1 teaspoon salt and cook until the potatoes are very tender.

Drain the potatoes, SAVE THE POTATO WATER, and mash the potatoes well. We used a potato ricer but if you don’t have something like that it works best to mash the potatoes in the water, just make sure you measure out the water as directed below first!

Measure out 3 cups of the reserved potato water. Add extra water if needed. Place the water and mashed potatoes in the bowl you plan to mix the bread dough in. Let cool to lukewarm (70-80F) – stir well before testing the temperature – it should feel barely warm to your hand. You should be able to submerge you hand in the mix and not be uncomfortable.

Add yeast to 2 cups bread flour and whisk. Add to the cooled mashed potatoes and water and mix well. Allow to rest/sit 5 minutes.

Sprinkle in the remaining salt and the softened butter; mix well. Add the 1 cup all-purpose flour, stir briefly.

Add 2 cups of the bread flour and mix until all the flour has been incorporated. Continue adding more of the remaining flour as needed until you can handle it.

Turn the dough out onto a generously floured surface and knead for about 10 minutes, incorporating flour as needed to prevent sticking. The dough will be very sticky to begin with, but as it takes up more flour from the kneading surface, it will become easier to handle. The kneaded dough will still be very soft. Place the dough in a large clean bowl or your rising container of choice, cover with plastic wrap or lid, and let rise about 2 hours or until doubled in volume.

Turn the dough out onto a well-floured surface and knead gently several minutes. It will be moist and a little sticky.

Preheat the oven to 450F.

Divide the dough into 2 equal portions, then divide each of those into thirds. Roll each segment into a rope, about 1/2 thick. Place three of the ropes on a sheet of parchment paper and braid lightly, being careful not to stretch. Pinch and tuck each end under, then repeat with the other loaf. Cover and let rise another 35-45 minutes or so, until doubled.

Lightly dust the top of each braid with a little flour and immediately transfer the loaves to a baking sheet and carefully place in the oven. Bake the loaves for 10 minutes, turn the oven down to 375F and bake for approximately 40 more minutes or until golden brown and a thermometer inserted inside reads 200F.

Transfer to a rack and let cool at least 10 minutes before serving.

As this was Thanksgiving, I thought a easily rip-able braid would be more appropriate than a slice-able loaf, but you can serve this anyway you want. As always, just have fun with it!


The Finer Things in Life

June 18, 2008

One of the things about being an adult, is that time seems to move so much faster than it did when we were kids. When we’re young, we spend our days imagining the future. Our biggest concern is avoiding the bully at school. We count the days until summer, then spend every moment we possibly can outside, enjoying the sun, and air, the sand at the beach, the trees we can climb…and those we can’t. All the little things that make our lives beautiful. We can’t wait until we grow up and can enjoy everything that’s held back by the adults in our lives.

Then once we become adults, other concerns crowd our minds. We think about bills, our health and that of our loved ones, and taxes. We spend our days, locked in an office, many of us without even a window. We have to force ourselves to eat well, rather than just what we manage to fit in. We crowd every hour of the day we can with the things we feel we have to get done, counting the minutes until we can go to bed. Even our weekends tend to be crowded with errands. And if you’re like me, you even feel guilty for taking a vacation or a single day off.

Thankfully, though we have mostly lost touch with the carefree children we once were, we can still force our selves to spend time on some of the finer things life has to offer. Like the sounds and smells of a summer storm, the taste of good chocolate or wine. Or both.

And of course, the feeling of a good dough in your hands, the smell of it baking and the taste of that first piece. I know not many of you enjoy making bread, and it has unfortunately become one of the things far too many people try to avoid these days, but I realized the other day that it had been way too long since I have made myself any bread, and it was a situation I personally had to remedy.

Crispy Loaf
Slightly adapted from: The Joy Kitchen

2 teaspoons instant yeast
1 1/4 cups warm water
4 1/4 cups flour
2 tablespoons shortening
1 tablespoon sugar
1 1/4 teaspoon salt
2 egg whites

Mix 2 1/2 cups flour, the yeast, shortening, sugar and water in a bowl, then mix in the salt.

Beat the egg whites until soft peaks form, the fold into the dough. Gradually mix in the remaining flour until the dough is soft but no longer sticky.

Knead until the dough is smooth and elastic. Transfer to a greased bowl, grease the top of the dough and cover with saran wrap. Allow to rise for 1 1/2 to 2 hours, or until doubled.

Punch down the dough, knead it briefly then let rise again until doubled. Repeat once more, then shape into a loaf. Allow to rise until doubled.

Preheat the oven to 425F. Transfer the loaf to a parchment covered baking sheet, then place in the oven and immediately throw in some ice to steam.

Bake for approximately 40 minutes, turning once half way through. Loaf should register about 200F on a thermometer inserted in. Allow to cool completely before cutting. Enjoy

This loaf was better tasting than anything I could buy, and well worth the time for that smell alone.

I hope you’ll try this, or something else that you’ve been putting off for lack of time. It’s well worth it to do one little thing like this, to make time for yourself and indulge a little.


Exploding With Flavor

May 26, 2008

I don’t know how many of you do a lot of your shopping online, but I am one of those people that gets rather obsessed with it (not food and toiletries of course, but other stuffs.) I actually do it so often that I have caught myself thinking in terms of online shopping for certain things that might actually be better in person.

My only real complaint with online shopping is the newsletters. Every single store now has their own newsletter that they throw out there. I am sorry, just because I happened to get a friend something from your store two years ago does not mean I want your spam! (Especially considering it does not help me control my spending when I constantly get the godiva newsletters).

Anyways, there are a few that will occasionally catch my eye and a few weeks ago the one from King Arthur  did just that. The title said “Crusty Cheese Bread Recipe…” Do you blame me for jumping to attention? *g* They even had a video showing how to make it! So this was something I knew I had to try and what better time than as the finale for my cheesy memorial day weekend?

Molten Cheesy Bread
Source: King Arthur Flour

Starter
1 1/4 cups (5 1/4 ounces) Bread Flour
1 teaspoon salt
1/2 teaspoon instant yeast
1/2 cup (4 ounces) cool water

Dough
all of the starter
9 ounces to 10 ounces lukewarm water
1 teaspoon salt
3 1/2 cups (14 3/4 ounces) Bread Flour
1/2 teaspoon instant yeast

Filling
2 1/2 cups (10 ounces) grated Gruyère cheese, or the cheese of your choice

To make the starter: Mix the 1 1/4 cups flour, salt, yeast, and 1/2 cup water in a medium-sized bowl. Mix till well combined. Cover and let rest overnight at room temperature.

To make the dough: Combine the risen starter with the water, salt, flour, and yeast. Knead to make a smooth dough. Place it in a lightly greased bowl, cover, and let it rise for 1 1/2 to 2 hours, till it’s nearly doubled in bulk.

Gently deflate the dough, and pat and stretch it into a 3/4”-thick rectangle, about 9” x 12”. Sprinkle with the grated cheese. Starting with a long side, roll it into a log, pinching the seam to seal. Place the log, seam-side down, on a lightly floured or lightly oiled surface. Cover it and let it rise for 1 to 1 1/2 hours, till it’s puffy though not doubled in bulk. Towards the end of the rising time, preheat the oven to 425°F.

Gently cut the log into four crosswise slices. Place them on two lightly greased or parchment-lined baking sheets, cut side up. Spread them open a bit to more fully expose the cheese. Immediately place them in the preheated oven. Bake for 30 minutes, or until the cheese is melted and the loaves are a very deep golden brown. Remove them from the oven, and cool on a rack. Enjoy!

Breadchick and the other ladies from the Great Cinnabon Knockoff Challenge also made this recently, so you should definitely check out their results 🙂


The Best Part of Waking Up

May 18, 2008

Even before I moved to New York I have loved bagels. Every once an a while, when I could convince my mother to go to the mall (she’s a people person, but can’t stand malls) we would treat ourselves to a perfectly evil dish. Salt bagels smothered in melted cheese. I refuse to think about what that might have done to our bodies cause it was well worth it to bite into those things.

That just makes it so much better that my wonderful city has perfected this tasty treat. I don’t know what it is about these things, but there is really nothing better to start your day with. Even if it isn’t smothered with cheese. 🙂

I don’t have them often now, and it’s even rarer that they have cheese on them, because there is no way I can convince myself that they’re even remotely good for me. Of course that rarity just makes them so much better, and the idea of actually having one fresh and homemade was impossible to pass up.

I admit, these aren’t as good as a real New York bagel, but it’s so much fun to make and so tasty, that I will definitely be doing this again.

Bagels
Source: The Fresh Loaf

Sponge:
1 teaspoon instant yeast
4 cups bread flour
2 1/2 cups water

Dough:
1/2 teaspoon instant yeast
3 3/4 cups bread flour
2 3/4 teaspoons salt
2 teaspoons malt powder (can substitute 1 tablespoon malt syrup, honey, or brown sugar)

1 tablespoon baking soda for the water
Cornmeal for dusting the pan
Toppings for the bagels

The Night Before:
Stir the yeast into the flour in a large mixing bowl. Add the water and stir until all ingredients are blended. Cover with plastic wrap and allow to rise for two hours.

Remove the plastic wrap and stir the additional yeast into the sponge. Add 3 cups of the flour, the malt powder, and the salt into the bowl and mix until all of the ingredients form a ball. You need to work in the additional 3/4 cups of flour to stiffen the dough, either while still mixing in the bowl or while kneading. The dough should be stiffer and drier than normal bread dough, but moist enough that all of the ingredients are well blended.

Pour the dough out of the bowl onto a clean surface and knead for 10 minutes.

Immediately after kneading, split the dough into a dozen small pieces. Roll each piece into a ball and set it aside. When you have all 12 pieces made, cover them with a damp towel and let them rest for 20 minutes.

To shape the bagel, punch your thumb through the center of each ball and then rotate the dough, working it into a bagel shape, making it as even in width as possible.

Place the shaped bagels on an oiled sheet pan, with an inch or so between one another. If you have parchment paper, line the sheet pan with parchment and spray it lightly with oil before placing the bagels on the pan. Cover the pan with plastic and allow the dough to rise for about 20 minutes.

The suggested method of testing whether the bagels are ready to retard is by dropping one of them into a bowl of cool water: if the bagel floats back up to the surface in under ten seconds it is ready to retard. If not, it needs to rise more. Place the covered pan into the refrigerator for the night.

The Next Day

Preheat the oven to 500. Bring a large pot of water to a boil. Add one tablespoon of baking soda to the pot to alkalize the water.

When the pot is boiling, drop a few of the bagels into the pot one at a time and let them boil for a minute. Use a large, slotted spoon or spatula to gently flip them over and boil them on the other side.

Before removing them from the pot, sprinkle corn meal onto the sheet pan. Remove them one at a time, set them back onto the sheet pan, and top them right away, while they are still slightly moist. Repeat this process until all of the bagels have been boiled and topped.

Once ready, place the sheet pan into the preheated oven and bake for 5 minutes. Reduce the heat to 450 degrees, rotate the pan, and bake for another 5 minutes until the bagels begin to brown. Remove the pan from the oven and let cool for as long as you can before digging in. Enjoy

I need to work on the shaping a bit (okay, a lot…they were kinda ugly) but they were also very tasty. Definitely worth trying again, especially if I can bribe one of my male friends to knead this very tough dough for me 🙂


Tasty Tweaks

April 22, 2008

It’s always fun to adjust recipes and try to perfect them to your own tastes. Most of the recipes that I have posted here so far, I have changed at least a little bit to make it perfect. A little extra butter, more sugar, less this, more that. Whatever it might take to make them perfect for me.

Well these rolls have been on my mind since I first made them. I assumed that adding sugar to the dough, maybe a little extra honey or something like that might give me what I was looking for, but they didn’t really turn out. That little bit changed the recipe just enough so it wasn’t quite as good as they were before, and the crust wasn’t the least bit crispy so I put it aside once again and continued to let it turn in the back of my mind, hoping to come up with something.

A couple days ago I was looking at the notes on The Fresh Loaf on substituting instant yeast for active dry yeast for another recipe I wanted to try, and a light bulb came on. Check it out…. “using less yeast and letting it rise more slowly will result in a more flavorful loaf.” Total epiphany moment.

So that is what I have done here. I reduced the yeast by a whole 1/2 teaspoon. I will probably do a less drastic reduction next time, but this is exactly what it needed. Now not only are they super pillowy soft inside and gloriously crispy outside; they are huge, and incredibly tasty. Don’t you just love when a recipe comes together like that??

Crispy Rolls Redux
Adapted from Harvest King Flour Recipe

3 1/4 cups flour
3/4 teaspoon instant yeast
1 1/2 teaspoon fine sea salt
1 1/2 cups water
2 teaspoons honey

In a large bowl, whisk together the flour and yeast. Stir in the water and honey then mix in the salt. Mix well by hand then dump out onto a work surface.

Knead the dough for approximately 10-15 minutes until soft and slightly sticky. You can add more flour or water as needed.

Put the dough in a lightly greased bowl. Grease the top of the dough then cover with a clean towel or saran wrap and allow to sit for two hours or more until doubled. This will take longer to rise than normal.

De-gas the dough, then cut it into eight even portions. Cover all but one.

Take the ball you are working with, flaten it and fold the edges in. Flaten and do it again, stretching the dough a bit as you go. Repeat until the bottom is smooth and flat. Place on a clean surface with the creased-side down and cover with a wet towel. Do the same for the other pieces.

Cover the rolls and allow to rise for another hour until doubled. Preheat oven to 450F. Put cookie sheet in oven about 5 minutes before you’re ready to bake them.

Place the rolls on a sheet of parchment paper on a pizza peel or sheet of stiff cardboard and carefully slide onto the cookie sheet. Bake for approximately 10 minutes, rotate the cookie sheet then bake for another ten minutes or until a thermometer inserted inside reads approximately 200F.

Remove from oven and immediately brush with melted butter. Allow to cool before diving in. Enjoy

As you can see I didn’t cut the tops this time and I kinda like the look it gave. It was also kinda cool to hear the crust cracking as it cooled.

These things are just so incredibly tasty, I will be using this recipe often myself. Let me know if you decide to try them.


The Joining of Two Loves

April 7, 2008

It’s no secret that I love bread. I’ve mentioned it before, and as I love cheese as well, it is understandable that I have a certain weakness for cheesy bread. The lovely soft, chewy texture of bread covered with oozy melted cheese or golden and crusty on top, infusing the bread with the tastes of great cheese. It’s really hard to resist.

This is one of those breads. With great cheese kneaded into the crust, the only thing that could make it better (besides a glass of wine) is melting more cheese on top once it’s done baking and serving it warm. Mmmmmm

This made a beautiful, crusty loaf, and though at first I was thinking a sharp cheddar might have been better, the more I eat, the more I believe the gruyere was the perfect choice.

Cheesy Braid Loaf
Adapted from recipe on Cookie Baker Lynn

1 1/4 teaspoon instant yeast
3/4 cup warm water
1 tablespoon sugar
1 teaspoon salt
3 eggs
1/2 cup butter, softened
3 1/2 cups all-purpose flour, divided
6 oz gruyere cheese, shredded

Vegetable oil

In a large bowl, whisk the yeast into 2 cups of the flour, then mix in the water, sugar, eggs and butter. Mix well with your hands to make sure all the butter is blended in well, then mix in the salt and as much of the remaining flour is needed to make a very soft, pliable dough. Turn dough onto a lightly floured surface and knead for a few minutes until smooth and elastic. Form into a ball and place in a greased bowl, lightly greasing the top. Cover and let rise for 2 hours, or until doubled.

Punch the dough down lightly, dump out onto your work surface, form into a rectangle then spread most of the cheese on top. Fold into thirds like a letter a spread more cheese on top. Repeat until you’ve used all the cheese then knead the dough to work the cheese into it evenly.

Preheat the oven to 375F.

Divide the dough into thirds and roll each segment into a rope, about 1/2 thick, 15 inches wide. Place each of the ropes on a sheet of parchment paper and braid lightly, being careful not to stretch. Pinch and tuck each end under, brush lightly with oil, cover and let rise another hour or so, until doubled.

Carefully transfer the dough and parchment to a cookie sheet and stick in the oven for 5-10 minutes, turn and bake for another 20 minutes until golden brown and a thermometer inserted inside reads 200F. If your loaf is browning too quickly cover loosely with aluminum foil and continue baking until done.

Allow to cool for at least an hour before diving in. Enjoy.

You can definitely cut this like a regular loaf, but I personally think it’s a lot more fun to tear off each of the braided bits. The original recipe also called for cubed chunks of cheese, which gives a more melty bread, but this way, instead of getting occasional pockets of cheese, the whole thing is absolutely infused with it.

Easy, beautiful and delicious, this one is definitely worth making again.


Therapeutic Biscuits

March 27, 2008

Everyone has a different name for those Pillsbury biscuits-in-a-tube. In my family, they were always called thump biscuits. It’s a fun name and of course accurate, since more often than not you have to thump them against the counter to get them to pop.

Since I started this blog I have not even remotely been tempted to buy those, so rest assured that is not what this recipe is about. No, these are BETTER than thump biscuits, because it’s made from scratch and you’re not just thumping a carton against the counter, you’re gonna beat the actual dough! How fun is that??

I think that’s actually one of the things I love most about making bread. You can work out all your frustrations. I’ve seen recipes that you have to slam it against the counter, this one you have to give it a good beating, and of course we can’t forget the wonderfully satisfying process of kneading. Bet you didn’t realize just how violent bread making could be. 🙂

I found this recipe on For the Love of Food (the host of the Taste & Create I just did). It was actually a recipe that she had adapted from another blog, and now it’s adapted here as well. I don’t think these will replace the buttery biscuits I made last month, cause I am kinda proud of how much I did to perfect that recipe but these were damn good and will be high on my list.

Buttermilk Biscuits
adapted from recipe on For the Love of Food

2 cups flour
1 tbl baking powder
1 1/2 teaspoon sugar

1 teaspoon salt
5 oz butter

3/4 cup buttermilk

Preheat oven to 450°F.

Mix all dry ingredients together in a bowl. Add the butter in smaller chunks and cut together with two knives or pastry cutter until it resembles coarse crumbs with some pea sized pieces. Then, add the buttermilk and mix in, once it gets too sticky, use your hand to mix.

Spread a thin amount of flour on your work surface and roll your dough into a ball.

Now comes the fun part. Thwack the dough with the rolling pin a few times then fold it in half. Close your eye, take a deep breath, visualize those who have annoyed you lately and…Thwack! Thwack! Thwack! Repeat the process until you’ve done it about ten times and all the days frustrations have passed.

Roll the dough out to about 1/2 inch thick or so and cut with whatever you want (knife, cookie cutter, biscuit cutter, glass, etc.) Go through the fold-and-thwack-and-cut process with the remaining dough until you’re done.

Place them on a baking sheet with the sides touching so that they rise up and not out. Bake for 15-18 minutes or until golden brown.

Serve warm, and enjoy!

These came out incredibly soft and tasty. I (as always) added a little extra sugar cause that’s just me, but you can adjust it according to your own tastes. The process of making them was almost as good as using a dammit doll!

Also, the very last bit of dough I shaped into a flatish-round with my hands since it was too small to cut and I actually liked how that looked after baking than the cut ones. It’s all a matter of taste but…and please excuse the pun…no matter how you cut it, these are sure to turn out great.


One Potato, Two Potato, Three Potato…

March 10, 2008

Yes, more potato bread 🙂

My friends and I are going to a big convention this weekend, and since we’re all pretty much broke we decided that bringing food instead of buying was the best idea. And of course, I offered to make bread for sandwiches! I have been torturing my dear friend Dean with pictures of all of my bread for a while now, so he was pretty excited with the idea.

Last month I made a recipe for potato bread. I considered using this one for my friends, since it was something I had been playing with for quite a while. A tried and true recipe, but while tasty, it felt like cheating. Even though I was doing it by hand, it used just potato flakes instead of real potatoes since it came from a bread machine cookbook. I don’t mind cheating once in a while. Shortcuts can be very good. But I wanted to make REAL potato bread and give them something great.

I have two new recipes to try this year and this is one. The other one had reviews from people who had actually tried it (since it was one of those Daring Bakers things I am sure you have seen around) but the reviews seemed rather mixed so I decided to be a little safe and go with this one first.


This is a real hearty bread. Wheat flour would make it even more so, but I honestly don’t think it needs it. This is nothing like the potato bread you’ll find in stores, but it’s great and super soft. Perfect for sandwiches or just munching on. I personally think it might need a little sugar, but other than that it’s great. I’ll let you know what my friends think when they try it. In the meantime…

Hearty Potato Bread
Source: A Year in Bread

2 cups water*
5 1/2 cups bread flour
2 teaspoons instant yeast
8 ounces mashed potatoes**
2 tablespoons butter
1 cup all-purpose flour
1 tablespoon salt

*You’ll use the water from boiling the potatoes for this. You can use regular water but this will be better
**Peel and cut a little more than 8 ounces so you can make sure you have enough

1. Peel and cut potatoes and boil for approximately 30 minutes, or until soft enough to mash. Measure out 8 ounces of potatoes, and two cups of water, plus a little more on the side in case you need it. Mash the potatoes in the potato water and allow to cool until approximately 100F.

2. Add the bread flour and yeast to the potato/water mixture. Add the butter and mix until well combined. Mix in the salt.

3. Spread the all-purpose flour onto your work surface and begin to knead the dough, adding more flour/water as needed. This will be a very slack dough but keep working it until it’s soft and supple.

4. Grease a large (very large, this is a huge loaf) bowl and put the dough in, greasing the top of the dough. Cover the bowl and let rest for approximately an hour, or until doubled in size. Punch down, cut the dough in half and let rest for a few minutes. Form two loafs and put them in greased loaf pans. Cover and let rise another hour, or until doubled in size.*** Preheat oven to 375F.

5. Cut two or three slits in the top, lighlty flour the tops and bake bread approximately 20 minutes. Turn and bake for another 15 minutes or until tops are golden brown and a thermometer inserted inside reads 200F.

6. Turn out loaves onto a cooling rack and allow to cool completely. Cut and enjoy 🙂

Like any bread, you don’t have to bake these in loaf pans. You can free-form these loaves easily, and I will probably do so next time I try it. I might also add a tablespoon or so of sugar, but it is still great without it.

*** This made HUGE loaves. I put about 8 ounces of dough aside so I could try it, make sure it was good before sharing a new recipe with people and it STILL overflowed my loaf pans. You might want to make three small loaves, or two loaves and a small baguette or something like that.