Exploding With Flavor

May 26, 2008

I don’t know how many of you do a lot of your shopping online, but I am one of those people that gets rather obsessed with it (not food and toiletries of course, but other stuffs.) I actually do it so often that I have caught myself thinking in terms of online shopping for certain things that might actually be better in person.

My only real complaint with online shopping is the newsletters. Every single store now has their own newsletter that they throw out there. I am sorry, just because I happened to get a friend something from your store two years ago does not mean I want your spam! (Especially considering it does not help me control my spending when I constantly get the godiva newsletters).

Anyways, there are a few that will occasionally catch my eye and a few weeks ago the one from King Arthur  did just that. The title said “Crusty Cheese Bread Recipe…” Do you blame me for jumping to attention? *g* They even had a video showing how to make it! So this was something I knew I had to try and what better time than as the finale for my cheesy memorial day weekend?

Molten Cheesy Bread
Source: King Arthur Flour

Starter
1 1/4 cups (5 1/4 ounces) Bread Flour
1 teaspoon salt
1/2 teaspoon instant yeast
1/2 cup (4 ounces) cool water

Dough
all of the starter
9 ounces to 10 ounces lukewarm water
1 teaspoon salt
3 1/2 cups (14 3/4 ounces) Bread Flour
1/2 teaspoon instant yeast

Filling
2 1/2 cups (10 ounces) grated Gruyère cheese, or the cheese of your choice

To make the starter: Mix the 1 1/4 cups flour, salt, yeast, and 1/2 cup water in a medium-sized bowl. Mix till well combined. Cover and let rest overnight at room temperature.

To make the dough: Combine the risen starter with the water, salt, flour, and yeast. Knead to make a smooth dough. Place it in a lightly greased bowl, cover, and let it rise for 1 1/2 to 2 hours, till it’s nearly doubled in bulk.

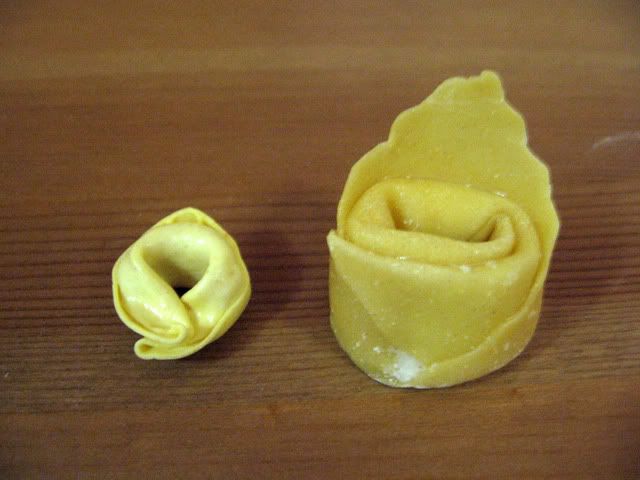
Gently deflate the dough, and pat and stretch it into a 3/4”-thick rectangle, about 9” x 12”. Sprinkle with the grated cheese. Starting with a long side, roll it into a log, pinching the seam to seal. Place the log, seam-side down, on a lightly floured or lightly oiled surface. Cover it and let it rise for 1 to 1 1/2 hours, till it’s puffy though not doubled in bulk. Towards the end of the rising time, preheat the oven to 425°F.

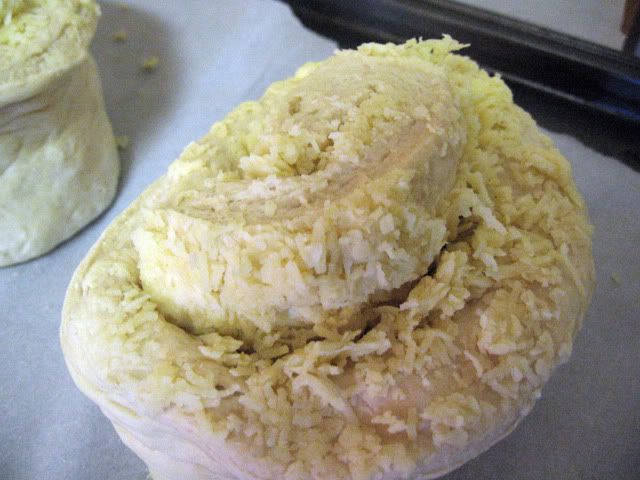
Gently cut the log into four crosswise slices. Place them on two lightly greased or parchment-lined baking sheets, cut side up. Spread them open a bit to more fully expose the cheese. Immediately place them in the preheated oven. Bake for 30 minutes, or until the cheese is melted and the loaves are a very deep golden brown. Remove them from the oven, and cool on a rack. Enjoy!

Breadchick and the other ladies from the Great Cinnabon Knockoff Challenge also made this recently, so you should definitely check out their results 🙂


Wrapped With Love

May 25, 2008

I am one of those people that tends to obsess about things. I am a worrier, but in this case I’m talking about stuff I enjoy. If I have a show that I really like I will buy every season and look things up online. If I have an author that I like (especially if it is a series of books) I will not only get all the books (thank you ebay) but will carefully, eagerly watch their newsletters and alerts for the publication date of their new books (I cannot tell you how much I hate it when those dates get pushed back!)

But books and tv are not the only things I obsess about. When I first started thinking about getting a pasta machine, I looked up every tip and recipe I could find and made many plans for the things I wanted to make. Well finally those plans are back on track and I can make one of my favorite types of pasta.

These aren’t quite as good as ravioli (not as much cheese hehe) but I have always found these cheese filled and beautifully folded bits of dough kinda enchanting. This would definitely go under the title of possibly-too-much-work-to-be-worth-it but I knew this was something I had to try at least once.

I’ve looked at many different instructions, and even found a video with a real Italian grandmother making these things so I’ve taken step by step pictures, just in case one of you find yourself with a few hours to blow and decide to give it a try 🙂

Homemade Tortellini

Pasta Dough
Cheese Blend
Egg Wash

Unfortunately I used the cheese left over from the pizza, and added ricotta, garlic and a few other things so I don’t have exact amounts for you, but you can use the same recipe I used for the ravioli.

Roll out the dough just a little thinner than you would roll it for pasta. Let the dough rest for approximately 30 minutes, then cut the dough into approximately 3×3 inch squares.

Cover all but one square and place it at an angle(like a diamond). Lightly brush the egg wash over the square, leaving one small corner dry.

Take about a quarter teaspoon of the cheese filling, place it at the corner opposite the dry one and begin rolling upwards, stopping at the dry spot.

Flatten it out carefully, making sure to get all the air out.

Pick up the tortellini and holding the cheese-filled part, roll one corner towards the middle and brush with the egg wash.

Roll the other corner in and smooth it carefully to make a good seal.

To cool, boil for a few minutes until they begin to float. Make sure to taste one for doneness before draining. Enjoy

Though this is a lot of work, it’s hard to beat homemade. Just look at the difference with homemade and store-bought.

This is so tasty and cheesy, it’s well worth the effort.


A Slice is Not Enough

May 24, 2008

All of us get kinda sucky, but very necessary jobs when we’re in high school. It is the time when parents stop paying for everything (and you stop wanting to tell them what you’re actually buying) so the need for some sort of cash flow must interrupt our social lives. For me that interruption came in the form of pizza.

The job wasn’t horrible (though I did gain a lot of weight from it *g*) but besides giving me money, it also ended up giving me the desire to figure out how to make the perfect pizza at home, and living in New York just raised the bar that much higher.

I have a decent-but-not great recipe that I have been using for a while for the dough but for some reason I could never get it just right, and of course it always took forever to cook.

Well, I was doing my random blog surfing one day and happened upon this recipe on 101 Cookbooks that sounded awesome and soon realized that I had to try it….and I had to get a baking stone. I now have a brand new baking stone, and can now try it! Horray!

If you decide to try this yourself please note you do need to start the day before you actually want it. And as any pizza dough you can freeze it for later. 🙂

Napoletana Pizza Dough
Slightly adapted from: 101 Cookbooks

4 1/2 cups (20.25 ounces) bread flour
2 teaspoons salt
1 teaspoon instant yeast
1/4 cup olive oil
1 3/4 cups water, ice cold (40°F)
Semolina flour or cornmeal for dusting

1. Stir together the flour, salt, and instant yeast in a 4-quart bowl. With a large metal spoon, stir in the oil and the cold water until the flour is all absorbed. If you are mixing by hand, repeatedly dip one of your hands or the metal spoon into cold water and use it, to work the dough vigorously into a smooth mass while rotating the bowl in a circular motion with the other hand. Reverse the circular motion a few times to develop the gluten further. Do this until the dough is smooth. The finished dough will be springy, elastic, and sticky, not just tacky, and register 50 to 55F.

2. Sprinkle flour on your work surface and transfer the dough. Prepare a sheet pan by lining it with baking parchment and misting the parchment with spray oil (or lightly oil the parchment). Cut the dough into 6 equal pieces. You can dip the scraper into the water between cuts to keep the dough from sticking to it. Sprinkle flour over the dough. Make sure your hands are dry and then flour them. Lift each piece and gently round it into a ball. Add more flour if the dough sticks to your hands. Transfer the dough balls to the sheet pan, mist the dough generously with spray oil and slip the pan into a plastic bag.

3. Put the pan into the refrigerator overnight to rest the dough.

4. On the day you plan to make the pizza, remove the desired number of dough balls from the refrigerator 2 hours before making the pizza. Dust the counter with flour. Place the dough balls on top of the floured counter and sprinkle them with flour; dust your hands with flour. Gently press the dough into flat disks about 1/2 inch thick and 5 inches in diameter. Sprinkle the dough with flour, mist it with spray oil, and cover the dough loosely with plastic wrap or a food-grade plastic bag. Let rest for 2 hours.

5. At least 45 minutes before making the pizza, place a baking stone in the oven. Preheat the oven as hot as possible. If you do not have a baking stone, you can use the back of a sheet pan, but do not preheat the pan.

6. Generously dust a peel or the back of a sheet pan with semolina flour or cornmeal. Make the pizzas one at a time. Cover your hands with flour including the backs of your hands and knuckles, and lift 1 piece of dough carefully. Very gently lay the dough across your fists and carefully stretch it by bouncing the dough in a circular motion on your hands, carefully giving it a little stretch with each bounce. If it begins to stick to your hands, lay it down on the floured counter and reflour your hands, then continue shaping it. Once the dough has expanded outward, move to a full toss. If you have trouble tossing the dough, or if the dough keeps springing back, let it rest for 5 to 20 minutes so the gluten can relax, and try again. You can also resort to using a rolling pin, though this isn’t as effective as the toss method. I couldn’t toss it but I let it hang and kept rotating the dough, letting gravity stretch it out.

7. When the dough is stretched out to your satisfaction (about 9 to 12 inches in diameter), lay it on the peel or pan, making sure there is enough semolina flour or cornmeal to allow it to slide (I placed it on a sheet of parchment paper). Lightly top it with sauce and then with your other toppings.

8. Slide the topped pizza onto the stone (or bake directly on the sheet pan) and close the door. Wait 2 minutes, then take a peek. If it needs to be rotated 180 degrees for even baking, do so. The pizza should take about 5 to 8 minutes to bake.

9. Remove the pizza from the oven and transfer to a cutting board. Wait 3 to 5 minutes before slicing and serving. Enjoy.

I hope you try this yourself sometime cause it’s really great an awesome recipe. I have never made a dough that was as soft and pliable. It is ridiculously easy to shape, and I have never made a tastier pizza at home, and I’ve even had worse at a restaurant (though not in NY, of course). I plan to indulge in a lot of cheesy recipes this weekend so I hope you’ll sick around for them. It should be much fun for all 🙂


Taste & Create IX: Cute Enough to Eat

May 20, 2008

This month’s T&C was so much fun. My partner, Stefani from Cupcake Project seems to be a lot like me, and her incredible blog has more cupcakes than you can imagine. She’s trying to find the perfect cupcakes for a friend’s wedding, which is actually the second one she’s done this for….so for me, rather than just one or two recipes I was interested in, there were like 6 different recipes that peaked my interest (at least 2 of which I will definitely be trying later). Anyways, when I found this one I knew I had to try it. It was just so cute!

All together now…AWWWWWWWWWW 🙂

Can you blame me for trying this one?

Granted, she had some problems with it. This was actually her second time trying donut cupcakes (doughcakes? cupnuts?…..god that sounds dirty! lol we’ll just stick with donut cupcakes) but she hadn’t had much luck with yeast in general in the past and as you all know…I have lots of fun with yeast so I thought it was worth a try 🙂

Donut Cupcakes
Adapted from: Cupcake Project

1 2/3 cup warm milk
2 tablespoons melted butter
2 teaspoons vanilla
2 eggs
5 cups flour
3/4 cups sugar
1/4 oz instant yeast
5 teaspoons cocoa powder

Whisk together the egg, milk, butter, and vanilla. Stir in the yeast, sugar and cocoa powder, then slowly add in the flour until you have a slightly sticky dough. You might not use all of the flour but if you do and it’s still too sticky you can add a little more flour. Move the dough to your work surface and knead it until it is nice and elastic. You can work in more flour as you knead if it is sticking to the counter or a little more milk if it’s dry. Put your dough ball into a buttered bowl. Cover and let sit for an hour or until it doubles in size.

Roll dough to about 1/2 inch thick. Use cookie cutters, a glass or whatever you have to cut doughnuts using something much smaller to cut the holes. Put doughnuts in cupcake wrappers in cupcake tins. Cover with a damp towel and let rise for another hour until doubled again. Preheat oven to 350F.

I was out of corn syrup when I thought I still had some left (I never run out of the stuff so I probably tossed it during my last cleaning spree) so instead of using her icing recipe I just used 1 cup powdered sugar, 1 teaspoon cocoa powder, 1 teaspoon cocoa liqueur and about 5 tablespoons water. Just mix it up in a small bowl, adding more water as needed to make it spreadable. Cover with saran wrap until you’re ready to use it.

Place the pan in oven and bake for 5 or 6 minutes, turn pan and bake for another 5 minutes until lightly browned. Remove from oven and carefully remove from cupcake pan, placing on a wire rack.

With an offset spatula, spread icing over the donut cupcakes while they are still warm. Decorate with sprinkles. Wanna know the best part? You can devour them while they’re still warm. Enjoy, and try not to eat all of them in one sitting 🙂 

This recipe gave me 48 of these donut cupcakes, with a ton of dough left over, so instead of making more I had a little fun with the left-over dough. 🙂


Love at First Bite

May 19, 2008

Thanks to the lovely Economic Stimulus check I finally have a replacement pasta machine! And this time I didn’t go cheap, I went for the more expensive one with the highest ratings, so hopefully it will last me for many years.

I’ve already done plain homemade pasta on this blog, and wanted to test it straight before doing something special so instead I decided to write about a new sauce. I am absolutely infatuated with this recipe. Seriously, it’s just…awesome. 🙂

This was a recipe done by the Greedy Gourmet several months ago for Presto Pasta Night hosted by Once Upon a Feast. When I saw the recipe it looked good. I thought it might be fun but honestly when I actually got around to trying it, it was love at first bite 🙂 I hope you’ll try it yourself cause even though it’s about as unhealthy as a sauce can get, it is soooooo worth it. This is just as creamy as any alfredo sauce with a zing of lemon that just gives it so much life. 

Creamy Lemon Romano Sauce
Adapted from: The Greedy Gourmet

6 oz Pecorino Romano, finely grated
Grated rind of 1 lemon
12 fl oz Heavy Cream
salt and pepper
1 tablespoon minced garlic

Brown the garlic lightly in a sauce pan. Mix in the cheese, grated lemon rind and cream.

Heat gently, stirring frequently until all of the cheese has melted and sauce begins to thicken. Season to taste. If it isn’t getting as thick as you would like it, add a little bit of corn starch, dissolved in milk.

Pour over pasta of your choice. Enjoy

I don’t know what it is about this sauce but I really can’t get enough of it. I can’t wait to try it over chicken or something like that. It really is a great recipe.


The Best Part of Waking Up

May 18, 2008

Even before I moved to New York I have loved bagels. Every once an a while, when I could convince my mother to go to the mall (she’s a people person, but can’t stand malls) we would treat ourselves to a perfectly evil dish. Salt bagels smothered in melted cheese. I refuse to think about what that might have done to our bodies cause it was well worth it to bite into those things.

That just makes it so much better that my wonderful city has perfected this tasty treat. I don’t know what it is about these things, but there is really nothing better to start your day with. Even if it isn’t smothered with cheese. 🙂

I don’t have them often now, and it’s even rarer that they have cheese on them, because there is no way I can convince myself that they’re even remotely good for me. Of course that rarity just makes them so much better, and the idea of actually having one fresh and homemade was impossible to pass up.

I admit, these aren’t as good as a real New York bagel, but it’s so much fun to make and so tasty, that I will definitely be doing this again.

Bagels
Source: The Fresh Loaf

Sponge:
1 teaspoon instant yeast
4 cups bread flour
2 1/2 cups water

Dough:
1/2 teaspoon instant yeast
3 3/4 cups bread flour
2 3/4 teaspoons salt
2 teaspoons malt powder (can substitute 1 tablespoon malt syrup, honey, or brown sugar)

1 tablespoon baking soda for the water
Cornmeal for dusting the pan
Toppings for the bagels

The Night Before:
Stir the yeast into the flour in a large mixing bowl. Add the water and stir until all ingredients are blended. Cover with plastic wrap and allow to rise for two hours.

Remove the plastic wrap and stir the additional yeast into the sponge. Add 3 cups of the flour, the malt powder, and the salt into the bowl and mix until all of the ingredients form a ball. You need to work in the additional 3/4 cups of flour to stiffen the dough, either while still mixing in the bowl or while kneading. The dough should be stiffer and drier than normal bread dough, but moist enough that all of the ingredients are well blended.

Pour the dough out of the bowl onto a clean surface and knead for 10 minutes.

Immediately after kneading, split the dough into a dozen small pieces. Roll each piece into a ball and set it aside. When you have all 12 pieces made, cover them with a damp towel and let them rest for 20 minutes.

To shape the bagel, punch your thumb through the center of each ball and then rotate the dough, working it into a bagel shape, making it as even in width as possible.

Place the shaped bagels on an oiled sheet pan, with an inch or so between one another. If you have parchment paper, line the sheet pan with parchment and spray it lightly with oil before placing the bagels on the pan. Cover the pan with plastic and allow the dough to rise for about 20 minutes.

The suggested method of testing whether the bagels are ready to retard is by dropping one of them into a bowl of cool water: if the bagel floats back up to the surface in under ten seconds it is ready to retard. If not, it needs to rise more. Place the covered pan into the refrigerator for the night.

The Next Day

Preheat the oven to 500. Bring a large pot of water to a boil. Add one tablespoon of baking soda to the pot to alkalize the water.

When the pot is boiling, drop a few of the bagels into the pot one at a time and let them boil for a minute. Use a large, slotted spoon or spatula to gently flip them over and boil them on the other side.

Before removing them from the pot, sprinkle corn meal onto the sheet pan. Remove them one at a time, set them back onto the sheet pan, and top them right away, while they are still slightly moist. Repeat this process until all of the bagels have been boiled and topped.

Once ready, place the sheet pan into the preheated oven and bake for 5 minutes. Reduce the heat to 450 degrees, rotate the pan, and bake for another 5 minutes until the bagels begin to brown. Remove the pan from the oven and let cool for as long as you can before digging in. Enjoy

I need to work on the shaping a bit (okay, a lot…they were kinda ugly) but they were also very tasty. Definitely worth trying again, especially if I can bribe one of my male friends to knead this very tough dough for me 🙂


Blush-worthy

May 16, 2008

I am shocked an honored that one of the bloggers I greatly admire, Evil Chef Mom, has decided to give me an award!

I haven’t been doing this all that long, but it’s been so much fun and this encouragement just makes it that much better. 🙂

So this is how it works:

1. Awarded parties must nominate five people who have not received the award.

2. The blogs that receive the award must serve some purpose.

3. In their post about the award they need to link back to this entry.

4. Awarded parties must post the award banner on their site. The banner must remain linked to this site.

So here are the five incredible bloggers I wish to acknowledge:

1. Kittens in the Kitchen – I haven’t commented that much on her blog, but she always has incredible recipes and one little thing she doesn’t know – her blog is actually one of the reasons I started this in the first place.

2. Straight From the Farm – Heathy and incredibly knowledgable, this woman never fails to inspire me. She has a great blog with incredible recipes and even better pictures and really deserves this award.

3. White on Rice Couple – I can’t believe these two haven’t received this award yet, because their blog is exactly the kind of thing this award was made for. They never fail to over new and helpful information, especially when it comes to the more traditional recipes, and they never fail to inspire.

4. For the Love of Food – Not only does this women constantly offer great recipes, but with the Taste and Create events she hosts with much dedication every month, she brings together other food bloggers that might not run into each other without it. What better purpose could a blogger have?

5. Baking Bites – this wonderful blogger not only offers great recipes that never fail, she also gives out general information that has proven to be irreplacable. This blog is one of the first places I go when I have questions.

Thank you again, Evil Chef Mom, for this award, and for the chance to acknowledge these incredible bloggers, and thank each of you for writing such great blogs.

Phew, now that this is out of the way, I should have more great recipes for you guys soon. Stick around cause I really think you’ll enjoy them 🙂


Just Desserts

May 10, 2008

One of my favorite bloggers, Evil Chef Mom has declared this day a day to paaaaarty! That means all of us out in this lovely world of blogging are preparing incredible dishes for our virtual pot luck!

Three guesses what I made…..yup, you guessed it, CHOCOLATE! It’s a little early for dessert, of course, but who says you have to save the chocolate till after dinner? hehe

Aaaand to make things even better for all of you out there joining our party, I came home to a wonderful treat last night. You see, Blake, of Blake Makes does wonderful food givaways for his faithful followers, and this last one gave every single one of us…yup, you guessed it…CHOCOLATE! Free Amano chocolate 🙂

I cannot tell you how great this chocolate is. I used the Ocumare for this recipe, but I had to of course eat some of it straight. For that I chose the Cuyagua, a limited edition chocolate and I gotta tell you, this stuff is amazing. It has such full flavor and body, like a fine wine. You should really check out the site and order some yourself.

But enough of that for now, you guys want the good stuff don’t you? Well how does this sound? Pudding, Chocolate Whipped Cream and Brownie crumbs, all with a little (okay, a LOT) of godiva dark chocolate liqueur? Hehe.

This stuff is perfect for any party, because not only is it easy and tasty, but it’s really easy to make it pretty, too 🙂

Triple Chocolate Pudding Parfait
Adapted from recipe on Epicurious

pudding
2 tablespoons cornstarch
1/4 cup sugar
1/4 cup unsweetended cocoa powder
pinch of salt
2 cups whole milk
4 oz chocolate, finely chopped
1 tablespoon unsalted butter
generous splash of chocolate liqueur

whipped cream
2 tablespoons sugar
1 tablespoon unsweetened cocoa powder
1 cup heavy cream
1 tablespoon chocolate liqueur

about 1 cup of brownies, crumbled
more chocolate liqueur

Mix all of the ingredients for the whipped cream in a bowl, but do not whip yet. Put in the fridge with your beaters/whisk to chill.

Whisk cornstarch, sugar, cocoa and salt in a saucepan, then gradually whisk in milk.

Bring to a boil, whisking constantly. Allow to boil until it’s nice and thick. Do not stop whisking while it’s cooking. Remove from heath and whisk in chopped chocolate and butter until melted.

Transfer pudding to a metal bowl and quick-chill by setting in an ice bath, stirring constantly. Allow to sit until you’re ready.

Take out the bowl with the whipped cream ingredients and beat until stiff peaks form.

Now comes the fun part. Sprinkle some of the brownie crumbs into the glasses/serving bowl/ dish you wish to use. drizzle on some of the liqueur, then layer the pudding and whipped cream. Repeat as many times as you can. Garnish as desired. Enjoy 🙂

I really had fun making this. If you’re gonna be sharing with kids you can take out the chocolate liqueur completely, and just replace it with vanilla for the whipped cream.  The Amano chocolate really made a difference with this. I have one more bar left, and already have a great idea for it 🙂


Sweetness By Request

May 6, 2008

I am one of those people that try to please everyone. I know, I know, it’s never a good idea, but I do enjoy making people happy. So when not just one, but two people commented about their interest in the cinnamon-sugar crackers, I just had to try it 🙂

I am pretty happy I did cause they really did turn out great, so ladies, I hope you’ll try it yourself. They’re well worth it!

Cinnamon Sugar Crackers
Source: Straight From the Farm

2 ½ c. flour
2 tablespoons sugar

1 teaspoon cinnamon
1 t. salt
4 T. olive oil
¾ c. cold water

For sprinkling on top:
3 tablespoons sugar
1 teaspoon cinnamon

Preheat oven to 400 F.  Mix dry ingredients together in a medium bowl being sure to get everything well blended.  Add the oil and half of the water and begin mixing.  Add more water as necessary to form a rough dry dough.  Turn dough out onto a lightly floured surface and knead just until it comes together into a cohesive ball.

Divide dough into even quarters.  On a piece of parchment paper, roll dough as thin as possible.  Cut the dough into squares or other desired shape and use a fork to prick each square.  Sprinkle generously with cinnamon/sugar mix.

Bake for 15 minutes, or until golden brown, turning the sheet once half way through.  While the first batch is baking, roll out another quarter of dough.  Let baked crackers cool before breaking apart.  Store in a ziplock bag. Enjoy

This is a wonderful treat, and it would be something fun to make with kids since it is so very easy.

Oh and I was tagged, so I might as well add it here. Grace from A Southern Grace was tagged for a new game called “Look What I Made” and decided to pass on the love. Basically, you compile a list of five recipes that you’ve tried from other blogs. Not so hard for me since that seems to be where I’ve gotten most of the recipes on this blog 🙂

The creator of this little game, Farida of Farida’s Azerbaijani Cookbook, says that “this is a great opportunity to give kudos to the fellow foodies whose recipes we used and inspire them to post more of their yummies. A way to say thank you for what they do. I also think this tag will help us discover some interesting recipes and blogs out there. There are a lot of delicious recipes hidden somewhere in the archives, and this tag may actually give them another chance to shine.”

So here we go five things I’ve made:

Artisan Herb Crackers from Straight From the Farm
Buttermilk Biscuits from For the Love of Food
Cheesy Bread Braid from Cookie Baker Lynn
Kahlua Hot Chocolate from We [Heart] Food
and
Hearty Potato Bread from A Year in Bread

Unfortunately I don’t have that many readers yet, so I don’t have many people to choose from to tag back. However, I will go with Krysta, the Evil Chef Mom, Either/both Todd and Diane from White on Rice Couple and Lisa Rene from Little Bits. Hopefully you guys will have fun with it and not hate me forever 🙂


The Hands-On Approach

May 4, 2008

So a while ago I mentioned that my pasta machine broke. It’s very sad. I missed making pasta enough that I got to the point that I even opened the damn thing up and tried to fix it myself. I thought I got it but of course when I tried to use it again it refused to play nice. *sigh* No problem, once I get that stimulous money I will be buying myself another. 🙂

In the meantime, I still miss making pasta, and friday night it hit me that there were types of pasta that didn’t need to be rolled out! I could make some of that easily! So yesterday I did just that. I made Cavatelli!

It’s an easy enough process, but takes a while so make sure you have the time before you start. It is well worth it though. It’s always so soothing to work with dough.

Cavatelli
Source: Eating Cleveland

16 oz. Ricotta Cheese
2 Eggs
1 Pinch of Salt
3 Cups (1 pound) All Purpose Flour
 

Pour about 2 1/2 cups of the flour into a bowl and make a well in the middle.  Add the eggs and cheese and stiring in circles, mix everything up well. Add more flour it needed.

Dump the dough out onto your work surface and knead it well, working in more flour as needed until you have a soft but not sticky dough. Cover and allow to rest for 30 minutes or more.

Divide the dough into at least eight balls (the smaller the balls, the easier it is to work with so you might even want to make it 16) cover all but one ball of dough. Take the ball you’re working with and roll it between your palms above your work surface, working it into a long thin tube. Once it gets harder to work with like that, place on the work surface and roll out with your palms until you have a long thin tube about 1/4 inch diameter.

Cover and work out the other balls the same way then cut each tube into pieces 1/2 to 1 inch long. 

With a pastry cutter or the flat edge of a butter knife, angle the blade at approximately 45 degrees, then starting at the far edge and pulling the dough towards you, drag the blade across the dough. It should roll up around the edge of the blade. Drop your cavatelli into a well floured pan and continue working till you’ve done all of the dough.

To cook, drop by handfuls into well salted boiling water and cook until it begins to float. Test one before taking them off the heat but fresh cavatelli should only need a few minutes to cook. Enjoy 🙂