Wrapped With Love

May 25, 2008

I am one of those people that tends to obsess about things. I am a worrier, but in this case I’m talking about stuff I enjoy. If I have a show that I really like I will buy every season and look things up online. If I have an author that I like (especially if it is a series of books) I will not only get all the books (thank you ebay) but will carefully, eagerly watch their newsletters and alerts for the publication date of their new books (I cannot tell you how much I hate it when those dates get pushed back!)

But books and tv are not the only things I obsess about. When I first started thinking about getting a pasta machine, I looked up every tip and recipe I could find and made many plans for the things I wanted to make. Well finally those plans are back on track and I can make one of my favorite types of pasta.

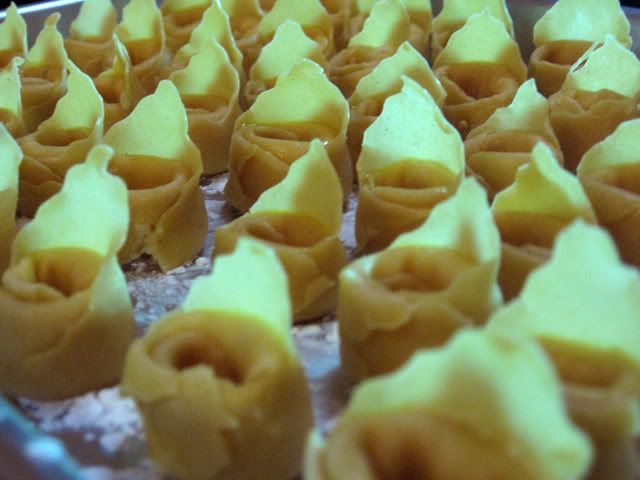
These aren’t quite as good as ravioli (not as much cheese hehe) but I have always found these cheese filled and beautifully folded bits of dough kinda enchanting. This would definitely go under the title of possibly-too-much-work-to-be-worth-it but I knew this was something I had to try at least once.

I’ve looked at many different instructions, and even found a video with a real Italian grandmother making these things so I’ve taken step by step pictures, just in case one of you find yourself with a few hours to blow and decide to give it a try 🙂

Homemade Tortellini

Pasta Dough
Cheese Blend
Egg Wash

Unfortunately I used the cheese left over from the pizza, and added ricotta, garlic and a few other things so I don’t have exact amounts for you, but you can use the same recipe I used for the ravioli.

Roll out the dough just a little thinner than you would roll it for pasta. Let the dough rest for approximately 30 minutes, then cut the dough into approximately 3×3 inch squares.

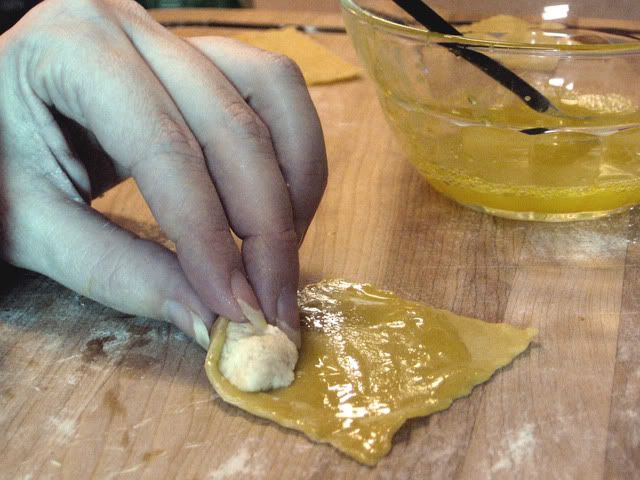
Cover all but one square and place it at an angle(like a diamond). Lightly brush the egg wash over the square, leaving one small corner dry.

Take about a quarter teaspoon of the cheese filling, place it at the corner opposite the dry one and begin rolling upwards, stopping at the dry spot.

Flatten it out carefully, making sure to get all the air out.

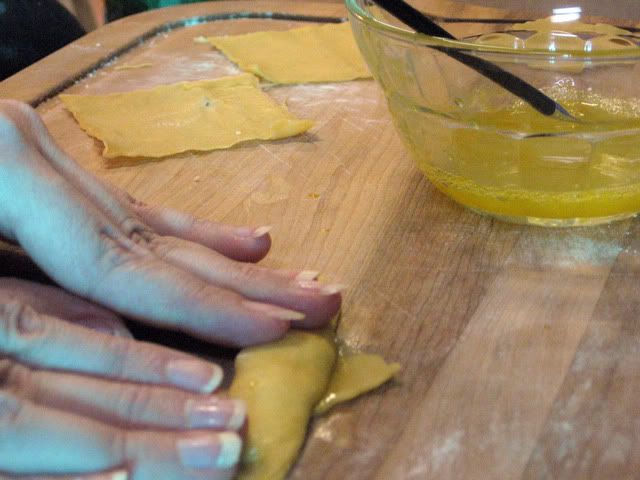
Pick up the tortellini and holding the cheese-filled part, roll one corner towards the middle and brush with the egg wash.

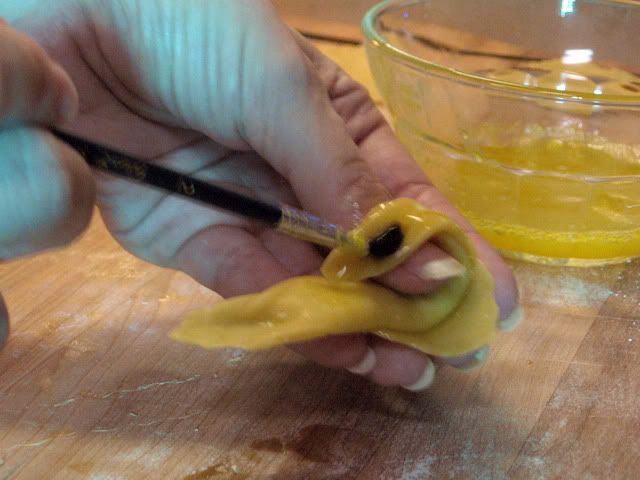
Roll the other corner in and smooth it carefully to make a good seal.

To cool, boil for a few minutes until they begin to float. Make sure to taste one for doneness before draining. Enjoy

Though this is a lot of work, it’s hard to beat homemade. Just look at the difference with homemade and store-bought.

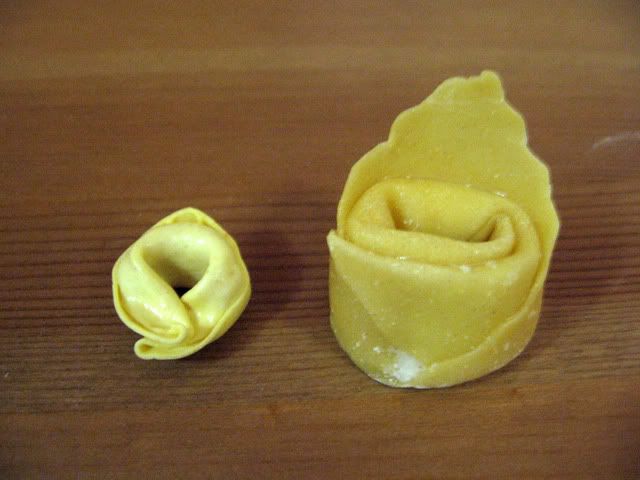
This is so tasty and cheesy, it’s well worth the effort.


Love at First Bite

May 19, 2008

Thanks to the lovely Economic Stimulus check I finally have a replacement pasta machine! And this time I didn’t go cheap, I went for the more expensive one with the highest ratings, so hopefully it will last me for many years.

I’ve already done plain homemade pasta on this blog, and wanted to test it straight before doing something special so instead I decided to write about a new sauce. I am absolutely infatuated with this recipe. Seriously, it’s just…awesome. 🙂

This was a recipe done by the Greedy Gourmet several months ago for Presto Pasta Night hosted by Once Upon a Feast. When I saw the recipe it looked good. I thought it might be fun but honestly when I actually got around to trying it, it was love at first bite 🙂 I hope you’ll try it yourself cause even though it’s about as unhealthy as a sauce can get, it is soooooo worth it. This is just as creamy as any alfredo sauce with a zing of lemon that just gives it so much life. 

Creamy Lemon Romano Sauce
Adapted from: The Greedy Gourmet

6 oz Pecorino Romano, finely grated
Grated rind of 1 lemon
12 fl oz Heavy Cream
salt and pepper
1 tablespoon minced garlic

Brown the garlic lightly in a sauce pan. Mix in the cheese, grated lemon rind and cream.

Heat gently, stirring frequently until all of the cheese has melted and sauce begins to thicken. Season to taste. If it isn’t getting as thick as you would like it, add a little bit of corn starch, dissolved in milk.

Pour over pasta of your choice. Enjoy

I don’t know what it is about this sauce but I really can’t get enough of it. I can’t wait to try it over chicken or something like that. It really is a great recipe.


The Hands-On Approach

May 4, 2008

So a while ago I mentioned that my pasta machine broke. It’s very sad. I missed making pasta enough that I got to the point that I even opened the damn thing up and tried to fix it myself. I thought I got it but of course when I tried to use it again it refused to play nice. *sigh* No problem, once I get that stimulous money I will be buying myself another. 🙂

In the meantime, I still miss making pasta, and friday night it hit me that there were types of pasta that didn’t need to be rolled out! I could make some of that easily! So yesterday I did just that. I made Cavatelli!

It’s an easy enough process, but takes a while so make sure you have the time before you start. It is well worth it though. It’s always so soothing to work with dough.

Cavatelli
Source: Eating Cleveland

16 oz. Ricotta Cheese
2 Eggs
1 Pinch of Salt
3 Cups (1 pound) All Purpose Flour
 

Pour about 2 1/2 cups of the flour into a bowl and make a well in the middle.  Add the eggs and cheese and stiring in circles, mix everything up well. Add more flour it needed.

Dump the dough out onto your work surface and knead it well, working in more flour as needed until you have a soft but not sticky dough. Cover and allow to rest for 30 minutes or more.

Divide the dough into at least eight balls (the smaller the balls, the easier it is to work with so you might even want to make it 16) cover all but one ball of dough. Take the ball you’re working with and roll it between your palms above your work surface, working it into a long thin tube. Once it gets harder to work with like that, place on the work surface and roll out with your palms until you have a long thin tube about 1/4 inch diameter.

Cover and work out the other balls the same way then cut each tube into pieces 1/2 to 1 inch long. 

With a pastry cutter or the flat edge of a butter knife, angle the blade at approximately 45 degrees, then starting at the far edge and pulling the dough towards you, drag the blade across the dough. It should roll up around the edge of the blade. Drop your cavatelli into a well floured pan and continue working till you’ve done all of the dough.

To cook, drop by handfuls into well salted boiling water and cook until it begins to float. Test one before taking them off the heat but fresh cavatelli should only need a few minutes to cook. Enjoy 🙂


Yes I Put Cheese On My Cheese

February 25, 2008

You might think I was exaggerating on my love of cheeeeeeese when I made the ravioli, but I really don’t. My favorite…okay, the only sauce I really ever put on those tasty treats is alfredo. Yes, more cheese. Other sauces just seem to take away from them. So of course I considered making my typical tried and true alfredo sauce with the ravioli this weekend, but in my little (or not-so-little) cache of recipes I knew I had a recipe for an almost but not quite alfredo sauce I wanted to try and this seemed like a great opportunity.

I love having a good creamy sauce so when I see those words connected to any recipe I will of course perk up and look at the ingredients and everything to see if it sounds like something I might like. More often than not I’ll just make notes on a post-it with the quantities and make up the rest as I go, because a good creamy sauce really doesn’t take that much effort.

Surprisingly this recipe in it’s original incarnation didn’t have any garlic in the sauce itself so working in the comments from other people, and of course garlic, this is what I came up with. A wonderfully sinful Garlic Asiago Creme Sauce. If you like this kind of thing I hope you’ll try this artery clogging recipe at some point cause it really is worth the problems it could cause you in the future 🙂

Garlic Asiago Cheese Sauce
adapted from recipe on allrecipies.com

1 tbl. garlic
1 chicken bouillon cubs
2 cups heavy cream
1/4 cup milk
1 tsp. cornstarch
1 cup grated asiago

Dissolve the chicken bouillon cube in the 1/4 cup milk. Pour into a sauce pan, add the garlic and allow to simmer for a few minutes.

Dissolve the corn starch in a tbl. of the heavy cream. Put aside. Add the remaining heavy cream and simmer for a few more minutes. Add the cheese and simmer, stirring frequently until cheese has melted. Add salt and pepper to taste.

Add the cornstarch/cream mixture and stir well. Simmer for a few more minutes then remove from heat.

Allow it to sit for a few minutes to thicken slightly then spoon over dish of choice. Enjoy 🙂

garlic asiago cheese sauce on cheese ravioli

This is a very creamy, buttery sauce. You can substitute any cheese you want with this recipe but definitely try the asiago. It’s very mild and rich and works beautifully with the cream.


Say Cheeeeeeese

February 24, 2008

Cheeeeeeese. I just love that word don’t you? And of course that’s the appropriate way to say it. Like the very word itself is melting like good mozzarella. Cheeeeeeese.

I know there are plenty of people out there that don’t really like cheese, or can’t have it for whatever reason but I am most definitely not one of them. Whenever I have a hunk of cheese in front of me I have to cut off the very first bit to eat fresh, even if I am supposed to be grating the entire thing for whatever I am cooking. If you like cheese nearly as much as I do, just wait until I share my mac and cheese or alfredo lasagna recipes because they are to die for. (Literally. The amounts of cheese in these things could kill you. hehe)

These little pockets of heaven have always been one of my favorite foods. And the best part about making them at home (besides nibbling the fresh cheese as I grate it and dreaming up plans for the leftover filling mixture) is that I get to control the amounts and types of cheese in it. That is just awesome 🙂

homemade ravioli

For this first try I used this ravioli thing I got off amazon. It makes it so much easier. I promise to do them without this toy one of these days and I’ll post the instructions here, but for this first time around I’ll direct you with the same thing I used.

Homemade Cheese Ravioli

Pasta:
500 g bread flour
4 eggs
corn starch for dusting

Filling:
9 oz Ricotta
2 oz parmesan
2 oz romano
2 oz asiago
2 oz mozzarella
4 tsp. minced garlic
2 tbl. bread crumbs

Egg Wash:
1 egg
1 tbl. water

Prepare filling first. Mix all of the ingredients in a bowl then cover and refrigerate until ready

Prepare egg wash, blending egg and water until mixed well. Cover and refrigerate until needed

Dump flour for pasta onto your work surface. Prepare a well in the center and add eggs. Mix with a fork until it forms a soft dough.

Allow dough to rest for 30 minutes before feeding through pasta machine. For more detailed instructions on making the pasta, read my blog here.

Roll the dough out to rectangles an inch or so larger than the metal frame. You’ll need to have an even number of strips, so you have tops and bottoms. Make sure you keep whatever dough you are not working on covered so it doesn’t dry out.

Place the metal frame on a table or counter and lightly dust the frame with corn starch to keep the dough from sticking. Lay one strip of the dough across the frame, then using the plastic piece gently make indentations in the dough.

Remove the plastic part and spoon in the chilled filling (approximately 1 tbl) then gently brush the egg wash around the edges.

Place the second strip of dough on top, remove as much air from the ravioli as possible then proceed to roll the rolling pin over the dough repeatedly until you can see the metal edges and the ravioli is sealed. Be sure not to get the corn starch between the two strips or they won’t stay sealed.

Turn the metal base on it’s side carefully and allow the ravioli to fall free. Cover them with saran wrap or put in a tupperware to keep them from drying out then continue with the next two strips until you run out of dough or filling. Keep the edge pieces that are cut off cause they can be re used if you keep them covered. Once you have finished, uncover whatever ravioli you plan to use and let dry for approximately 15 minutes before cooking.

homemade pasta

Prepare a pot of generously salted water. Bring water to a boil then drop handfuls of the ravioli in at a time. You don’t have to cook them all at once. When the ravioli float to the surface allow them to boil for a few minutes more, then carefully fish out one with a spoon, cut off a small corner to test doneness.

When they are done add sauce of your choice and enjoy 🙂 

I can’t wait to experiment more with filling. Colby, Jack, Cheddar (lol would make it like a reverse mac and cheese), Gruyere, Fontinella….the combinations are endless 🙂

homemade cheese ravioli


Strega Nona

February 9, 2008

I don’t know if anyone else remembers the children’s book, Strega Nona, about the witch with the magic pasta pot. Her assistant plays with the pot while she is away and ends up flooding the town with pasta! YUM!

strands of pasta

This was always one of my favorite stories as a kid. I never wanted a pony, but I really wanted that magic pasta pot. Hot fresh pasta anytime I wanted it. Hell, I wouldn’t have minded helping “Big Anthony” clean up the town.

My favorite new toy isn’t a magic pasta pot, but it is the next best thing.

pasta machine

I finally got to use my shiny new pasta machine this weekend. Now, I must confess, this is not the first time I have made homemade pasta. I tried before a couple years ago but just could not roll it out flat enough by hand. It tasted okay, but it wasn’t great. The results this time were very different.

I knew the recipe I had was gonna make a lot of pasta but this was just awesome, and so much fun. After mixing the dough I let it rest a few minutes, turned on some good music and … got rollin’ 😉

It took me about four hours start to finish but oh man was it worth the effort. Beautiful, silky, very tasty pasta. And the fact that I made it from scratch just makes it that much better.

pasta

Homemade Pasta

500g Bread Flour (you can substitute all-purpose flour, but bread flour works better)
4 eggs
Corn starch for dusting

Make a mound with the flour on your work surface and scoop out a well in the middle. Pour the eggs into the hole and work the eggs and the flour together with a fork till you have a smooth dough, adding just a little water if necessary.

Knead the dough for ten to fifteen minutes, until it is smooth, firm, and elastic. Cover with saran wrap and allow to rest for 30 minutes. 

Separate the dough into four pieces and cover up three with a damp paper towel while you work with the other. Sprinkle the corn starch on your work surface and smush the ball of dough to make it just a little flat, then feed into the pasta machine at the largest setting. Fold the dough in thirds and feed it through again. Repeat 6-8 times to knead the dough. Cover and allow the dough to rest for 10-15 minutes.

If the dough starts to get the least bit sticky while rolling, dust both sides of the dough and the pasta machine with the corn starch.

Turn the pasta machine to the next smallest setting then feed it through again. Flip the dough over so the top is facing down and feed it through again. Turn the machine to the next smallest setting and repeat. Continue till you reach the desired thickness, then cover with saran wrap and repeat with the other balls of dough. Remember to dust the dough with corn starch if it gets sticky.

The dough will get really long as you work with it, so if you need to, cut it to keep it to a workable length.

Once all of the dough has been flattened, allow it to rest covered for 10-15 minutes then feed it through the cutter attachment of your choice and hang your fresh pasta to dry.

Prepare a pot of salted water. Once it has begun boiling, drop the pasta by handfuls, stirring occasionally. Homemade pasta will cook fast, so test it as soon as the water starts boiling again.

Serve and enjoy

I have new sauce recipes I want to try, but I really wanted to get the taste of the pasta itself, so this time I had it with just some browned butter, garlic and parmesan 🙂

A few notes:

1. The first few times you feed your dough through the machine it will probably look a little rough and weird. Just keep folding and feeding it through till it looks good, then do it a couple more times before adjusting the settings.

2. You probably won’t need the smallest, or even the next to smallest setting to get it thin enough. Keep an eye on it and keep in mind that the thinner it is, the faster it will dry, and cook.

3 Keep flouring the dough if you need to. It’s gonna get hard to work with if it gets sticky and the extra flour won’t hurt anything. 


Greetings!

February 1, 2008

Okay, so, as long as I can remember, I have enjoyed being in the kitchen, especially baking. I didn’t do it from scratch that much as a kid … my mother was raising three kids on her own so we didn’t have much time; but I did enjoy it (even when I was too picky to eat most foods) and lately I have been trying more and more difficult stuff. Challenging myself. I am slowly teaching myself, gathering recipes (trying to find what I would consider the perfect chocolate chip cookie)…all that fun stuff.

Last year I tried a Molten Chocolate Cake. For a first attempt at something as complicated, I was pretty proud of the results. That is actually what made me think of starting a blog on my cooking exploits.

Molten Chocolate Cake

What made me decide to actually start this thing, was my purchase of a beaoootiful new pasta machine!

So I scoured the web and found tons of new recipes and plan to try them all eventually, and share them all here. Regardless of whether anyone is actually out there listening.

So before we begin, a few things you might want to know:

  • I believe cheese, pasta and chocolate are the most important foods life has to offer, so my cooking will show that 🙂
  • I will mostly be baking deserts, breads and making pasta recipes. I am what my mother calls a carbovore.
  • Because of work, I really only have time to do the difficult cooking on the weekends, so my blogging will reflect that.
  • I am a pretty picky eater, so you will probably notice that with these recipes. If you follow any of them yourself, please feel free to expand on them. Add your favorite seasonings or spices, pair them with a dish you love, whatever.
  • I am pretty inexperienced, and doing all of this for fun. Most of the skills I know are self-taught and I am slowly working on expanding skills, and kitchen equipment to actually do everything right.
  • I don’t have a big family so I mostly end up eating all the leftovers myself or sharing it with friends.

Okay, I think that’s about all for now. There are several things I want to try this year. The list below are the ones I am most looking forward to so as the year goes on, I’ll keep adding entries about each attempt. My goal is to make at least one thing every month, but I have no doubt I will try more later 🙂

This is what I plan to attempt this year in no particular order:

Homemade Pasta
Roasted Garlic Pasta
Cheese Flavored Pasta
Ravioli
Tortellini
Gnocchi
Cavatelli
Caramel and Chocolate Brownie Tart
Flourless Chocolate Cake with Ganache Icing
Cheese Stuffed Focaccia

All the pastas are from scratch, of course. I also plan to mix and match stuff, I have several different pasta recipes I want to try (some with olive oil, some without). I have two new potato bread recipes I want to try … and I hope to try the Molten Chocolate Cake again. I’ll share pictures, the recipes and stories as I go along so hopefully this stuff will work out well.

Happy cooking,

Laurie
Â