Pie Day II: My Chocolate Pie-Lettes

March 14, 2009

One of the fun things about living in this country is all of the made up holidays. Days randomly picked out of the year to make us do silly things (anyone else celebrate backwards day when they were in school?) or on the side of the spectrum, force us to buy yet another gift to prove we love the people in our lives. There are holidays to make us more aware of environmental or health issues and there are holidays to celebrate the joys of things like yo-yos, and bubble wrap!

Last year I celebrated what has quickly become my favorite fake holiday. Pie Day! Not only does it celebrate a delicious dessert, but it makes this day (3.14) so wonderfully punny! It isn’t as funny if I explain too much so I really hope you get it 🙂

Anyways, last year I made a naked chocolate pie, with yummy caramel squished between a chocolate crust and a thick brownie layer. It was delicious and evil and more than a bit naughty.

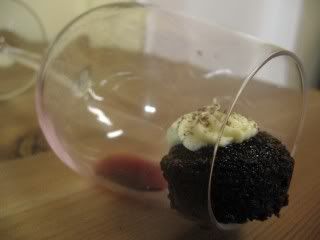
This year I decided to go with something a lot more simple, but something that has always been my favorite (especially at thanksgiving…pie day for all the non-bloggers). A simple chocolate silk pie…or should I say mini chocolate pie-lettes. 🙂

I tend to prefer a graham cracker crust with my chocolate pie. I don’t know why but it just seems to work better with the chocolate than a crispy, flaky but not as sweet crust. However, this year we decided to go with a shortbread crust and I think I have become a convert. The contrast between the silky chocolate and the delicately sweet, crumbly crust is just amazing, especially considering we decided to make little bite-sized pie-lettes. 🙂

Chocolate Silk Pie-lettes
Source for crust: Joy of Baking

Crust:
1 cup (227 grams) (2 sticks) unsalted butter, room temperature
1/2 cup (72 grams) confectioners (powdered or icing) sugar
1 teaspoon pure vanilla extract
1 1/2 cups (210 grams) all purpose flour
2 tablespoons (30 grams) cornstarch or rice flour
1/8 teaspoon salt

Chocolate Filling:
2 tablespoons cornstarch
1/4 cup sugar
1/4 cup unsweetened cocoa powder
pinch of salt
2 cups whole milk
4 oz chocolate, finely chopped
1 tablespoon unsalted butter
generous splash of chocolate liqueur

Whipped Cream:
2 tablespoons sugar
1 cup heavy cream
1 tablespoon chocolate liqueur

Crust:
Lightly butter miniature muffin tins or fill the tins with miniature cupcake wrappers. Set aside. Preheat oven to 325F. 

In a large bowl, cream the butter and sugar together (approximately two minutes). Beat in the vanilla extract.

In a smaller bowl whisk the flour, cornstarch and salt. Gradually add this into the butter mixture and mix just until incorporated. Place the dough in the refrigerator and chill approximately 1 hour.

Divide the dough into even pieces (approximately 1/2 ounces each, 32 balls) and place one ball of dough in the center of each muffin tin. With your fingertips, press the dough up the sides of the individual muffin tin so there is an indentation in the center. Once filled, place the tart pan, with the unbaked shells in the freezer for about 10 minutes so the shortbread can become firm.

Bake for approximately 18 – 20 minutes or until lightly browned. About halfway through the baking time, lightly prick the bottom of each shortbread, with the tines of a fork, if they have puffed up. Check again after another five minutes and prick again if needed. Once they are fully baked, remove from oven and place on a wire rack to cool.

Filling and Topping:
Mix all of the ingredients for the whipped cream in a bowl, but do not whip yet. Put in the fridge with your beaters/whisk to chill.

Whisk cornstarch, sugar, cocoa and salt in a saucepan, then gradually whisk in milk.

Place on the stove and bring to a boil, whisking constantly. Allow to simmer until it’s nice and thick. Do not stop whisking while it’s cooking or you’ll get lumps. Remove from heat and whisk in chopped chocolate and butter until melted.

Transfer filling to a metal bowl and quick-chill by setting in an ice bath, stirring constantly. Allow to sit until completely cool.

Pour filling into a ziplock bag or piping bag and fill the crusts.

Take out the bowl with the whipped cream ingredients and beat until stiff peaks form. Generously top the pie-lettes, then decorate as desired. Enjoy!

These things really are amazing, and the few leftovers we had were even better after sitting in the fridge! (Don’t you love that?) If you try them yourself, keep in mind that the crust really does rise quite a bit if you aren’t careful so make sure you keep it nice and cold before popping it in the oven, or you won’t be able to put enough chocolate…and the more chocolate you can fit, the better. You can even use pie weights or rice (on top of foil, of course) if you decide to make a full sized pie.

Also, anything will work well for decorating: shaved chocolate, chocolate chips, berries, brownie crumbs… just be creative! You can also add 1 tablespoon of cocoa powder to the whipped cream for chocolate whipped cream.

Whatever you decide, it really is an incredible pie, and well worth any holiday…even the fake ones. 🙂


A Great Way to Die

March 9, 2009

What is it about the phrase “death by chocolate” that fascinates us so? If you do a google search on the phrase, among the many different recipes you can find all sorts of strange and fun things. Like a site handing out shirts and chocolate syrup for you to fake your death, a murder mystery party for pampering yourself and your girlfriends, a death by chocolate bake-off (looks like we just missed it!). There is even a music video!

If you think about it literally, the idea isn’t actually all that great. You could choke on an m&m – painful. You could eat nothing but chocolate for years – not … enough .. variety. You could fall in a river of chocolate…okay, maybe that one is not so bad. Sure you would drown, but you would be wrapped in warm, silky goodness. By time it happened you might not care!

But in all seriousness, my man and I decided to make a Death By Chocolate Cake earlier this year.

When you make something like the flourless chocolate cake we made, it’s hard to top. This one doesn’t do that, but it’s just as good, it’s easier to make as you don’t have to set it in a pan of water to bake it. But more than that, what could be more appealing than the image of the chocolate cake itself drowning. 🙂

Death by Chocolate Cake
Source:
The Great Book of Chocolate

Cake:
8 oz dark chocolate, coarsely chopped
2/3 cup all-purpose flour
1 teaspoon baking powder
1/4 teaspoon salt
1/2 cup butter
3/4 cup granulated sugar
3 large eggs, separated
3 tbl chocolate liqueur

Ganache:
8 oz dark chocolate, coarsely chopped
3/4 cup heavy cream
2 tablespoons unsalted butter
1 tbl chocolate liqueur

Cake:
Preheat the oven to 350. Butter and flour (or sugar) a 9-inch springform pan.

Melt the chocolate in a double boiler over barely simmering water. Let cool.

Mix the flour, baking powder, and salt in a medium bowl. Beat the butter and sugar in a large bowl with an electric mixer until creamy.

Add the egg yolks, one at a time, beating until just blended after each addition. With mixer at low speed, gradually beat in the cooled chocolate, dry ingredients, and liqueur.

With mixer at high speed, beat the egg whites in a bowl until stiff peaks form. Use a large rubber spatula to fold the egg whites into the batter.

Spoon the batter into the prepared pan and bake until springy and a tester comes out clean – 40-50 minutes.

Cool the cake in the pan for 5 minutes. Turn out onto a wire rack and let cool completely.

To prepared the ganache, heat the cream and butter in a pan over medium heat and bring just to a boil. Pour the cream over the chocolate and stir until smooth. Add the chocolate liqueur and mix well.

Spread a very thin layer of the ganache on the cake and refrigerate for five minutes. Pour the rest of the ganache over the cake (being careful to pay attention to what you’re doing, and not the camera so you don’t drown your kitchen). Spread with a butter knife as needed, add whatever decorations you desire and refrigerate until the ganache is set or you’re ready to serve. Enjoy. 

We did the cake-drowned-in-ganache instead of the frosting recipe originally given but if you’re curious just let me know and I can send you the frosting recipe. However, we are obsessed with ganache and this recipe, leaves for a very simple but … to die for chocolate cake. (Sorry, I had to say it)  🙂


Fun with More Amano

February 27, 2009

One of the fun things about being a food blogger is the occasional giveaways. Some people out there are very generous.

Blake, of BlakeMakes happens to be one of the people, and earlier this year he had a giveaway of one of my favorite things. Chocolate! It’s hard enough to resist chocolate on it’s own, and even harder to resist it when it’s free!

And this wasn’t just any chocolate, it was Amano chocolate! The same thing I got from the last Blake Make’s giveaway that I participated in, but different. I have now tried four different types of chocolate from these people, and each and every one was unique, and incredible. I really can’t describe how great this chocolate is, but it’s obvious they take a lot of care to make it right.

For example, Jambra, the chocolate I received in this giveaway … well, I don’t want to sound like one of their spokes people, but they work hard to pick the best ingredients so their chocolate is unique and well worth every penny.

It took a while to pick the right recipe for this chocolate and decided to go with the chocolate chip brioche recipe in new cookbook I got for christmas. I have never made brioche before, and while this had a touch too much butter, and not nearly enough chocolate it was really great.

Chocolate Chip Brioche
Source: The Great Book of Chocolate

1/2 oz instant yeast
1/3 cup warm milk
2 tablespoons superfine sugar
1 teaspoon salt
3 1/3 cups all-purpose flour
4 large eggs
1 1/3 cups butter, softened
2 oz chocolate
1 egg yolk, lightly beaten with 1 teaspoon of milk, to glaze

Place the yeast, milk, sugar and salt in a small bowl and stir gently. Set aside 10 minutes.

Place the flour in a large bowl and pour in the yeast mixture. Beating slowly, gradually add the eggs to form a soft dough.

Turn out onto your work surface and knead until soft and smooth, about 5 minutes. Add the butter a little at a time. Continue until all the butter has been added, then knead for 5 more minutes.

Add the chocolate and knead until well combined with the dough.

Cover the bowl with a clean cloth and leave in a warm place until it has doubled in volume, about 90 minutes. Gently remove the risen dough from the bowl and on a floured work surface, flipping the dough over with your fingers.

Place on a tray and refrigerate for up to 2 hours. Grease 16 small brioche molds with melted butter.

Preheat the oven to 400.

Weigh off sixteen 1-ounce pieces of dough for the base of the brioches and sixteen 1/3 ounce pieces for the tops.

Shape the larger pieces of dough into tight balls and place in the bottoms of the molds. Shape the smaller pieces of dough into tear-drop shapes. Using your finger, make a hole in the larger balls and poke the teardrop into the holes.

Using a pastry brush, lightly glaze with the egg mixture. Cover with a cloth and set aside in a warm place to double in volume, about 30 minutes. Brush with the glaze again.

Bake until golden brown, about 10 minutes.

I’ve posted the recipe as written, however we ran into a few issues, so these are my notes:

It was a little too buttery, so you might want to use a little less, however, lots of butter makes it flaky, so don’t take out too much if you do adjust it.

I also don’t believe the recipe was nearly chocolaty enough, nor were they sweet enough. I would suggest adding more chocolate (I think we added twice as much as was called for and it still wasn’t enough) adding some cocoa powder, and maybe adjusting the sugar level.

We also had a problem with the time. 10 minutes wasn’t nearly enough, and more time made them too dark. The second batch we baked covered with foil for about 20 minutes, then uncovered for 10, and we tested the inside temperature to make sure that it was 200F, to assure that they were completely baked.

Don’t let any of this prevent you from trying them, though. They were really fun to make and well worth the time. I really wish we had used a tried and true recipe, to do this incredible chocolate some justice, but it was a fun challenge and awesome chocolate.


When is a Pretzel, Not a Pretzel….

January 7, 2009

I feel like I am getting in a bit of a rut, making so many cookies. Maybe I should rename my blog… what do you think of “Heaven is a Cookie” … or “Hell on a Cookie Platter” *g*. It’s just so hard to step away from such a happy little treat, as I am sure everyone with brand new sugar and/or cookie and/or diet resolutions have figured out.

Well, I have this one additional cookie recipe, then I promise, we’ll try to get creative and have some real fun. Though I can’t promise the next few recipes will be any healthier. At least these cookies aren’t totally cookies. They are pretzels too. Or are these pretzels that are cookies too? Well, it doesn’t matter, They are really good. The original recipe called for them to be drizzled with white chocolate, but we really loved the mint slime from the previous recipe so we used that instead. I have a feeling that the white chocolate would have been better.

Chocolate Pretzels
Source: The Great Book of Chocolate

2 cups flour
2 tbl cocoa powder
1 tsp baking powder
1/2 tsp salt
3/4 cup butter, softened
1 cup sugar
1 egg
1/2 tsp cocoa liqueur
4 oz white chocolate

Mix flour, cocoa, baking powder and salt in a medium sized bowl. Beat the butter and sugar in a large bowl until creamy add egg and liqueur. Gradually beat in dry ingredients.

Divide dough in half, press into disks, wrap and chill 30 minutes.

Preheat oven to 350F.

Form dough into approximately 22 balls and roll each into a rope approximately 12 inches. Make each rope into a pretzel shape by twisting two ends around each other then bringing both back near to the center of the strip.

Bake until firm, about 10-12 minutes. Transfer to wire racks and cool completely.

Melt white chocolate in double boiler. Drizzle the cool cookies with the chocolate and let stand for 30 minutes to set. Enjoy 🙂

We had a lot of fun using the whisk attachment of my new hand mixer (the overdose of Christmas cookies killed my last ones) and these cookies were great. Be creative with them. Dip them in chocolate, or drizzle with white chocolate, or dark chocolate, or the slime. Or any combination of the above. The dough for these was slightly saltier than a regular cookie dough but that’s the way a pretzel should be and it was just amazing once they were done.


A Kiss for the New Year

January 6, 2009


Okay, so I know I’ve done a lot of cookies recently, but one of the very generous gifts I received over the holidays was The Golden Book Of Chocolate(can you say, “woohoo?” 🙂 ). So my man and I had a lot of fun going through picking out all the recipes we plan to make this year. It’s actually got a great selection, even for someone as picky as I am, so we will be dipping into the great big book several times this year.

I honestly don’t know why we were so fascinated by these cookies and chose to make them first. Maybe it was the mint. Or the several layers of chocolatey goodness. Whatever it was, they didn’t come out quite like the picture in the book, and we will have to work on them a bit to make them come out as pretty, but they were definitely a great start to the new year.

Minty Chocolate Kisses
Slightly Adapted from: The Great Book of Chocolate

1 cup flour
2 tbl cocoa powder
1/8 tsp salt
1/2 cup butter, softened
1/4 cup sugar
1 tsp mint extract
1 egg

filling
1/2 cup heavy cream
8 oz white chocolate
1 tsp mint extract
Food coloring, if desired

glaze
5 oz chocolate
1/3 cup butter

Mix flour, cocoa and salt in a medium bowl.

Beat butter and sugar in a large bowl until creamy, then add the mint extract and egg beating until blended. With a mixer, gradually beat in dry ingredients. Press dough into a disk wrap and chill 30 minutes.

Preheat oven 350F. Roll out dough on floured surface to 1/8 inch thick. Cut out cookie cutters*. Place cookies 1 inch apart. Bake until golden at edges 6-8 minutes. Cool on cookie sheets for 5 minutes then transfer to cooling rack.


Bring cream to a boil, remove from heat and stir in white chocolate until completely melted. Add mint extract and food coloring, if desired.**

Cool until firm but not set, approximately 30 minutes. Pair cookies to match as closely as possible and fill.

Melt chocolate and butter in a double boiler. Spread on top of cooled cookies. Drizzle with additional mint filling. Chill until set 30 minutes. Enjoy 🙂

These things are incredible. Definitely the kind of thing you’d want to make a double batch, because even as thin and as tiny as we made them, it just wasn’t enough. Maybe next time we’ll double the size of the cookies 🙂

* For this first attempt, the dough came out way too moist to roll, even freezing it for a few minutes first. If you would prefer to roll them out, add more flour until it’s nice and thick first. Otherwise, you can roll the dough into balls and press until thin disks before baking.
** We didn’t allow the filling to cool for nearly long enough so it was a rather fun, goopy mess. It didn’t look nearly as nice as it should have, but it was darn tasty.


Christmas Cookie Edition – Volume 3: Cookie Bling

December 19, 2008

 
I don’t know what it is about cookies, but they always seem to make people so happy, especially around the holidays, and they are so easy to make! You can use any recipe at all, no matter how many times you’ve made them during the year and just let your imagination wander.

Below are four ideas that I used this year to make my cookies special, but you can do anything you want. Just have fun with it.

1. Oreo Snowflakes

Just roll out the dough for Oreo cookies, use a Snowflake shaped cookie cutter and bake them as usual then carefully spread the filling on the cookies. Then you can either leave them as is, dust the top with powdered sugar like snow, or colored sprinkles to make them pretty.

2. Starry Cookies

Take a simple sugar cookie recipe, use a star shaped cookie cutter and before baking, sprinkle sparkling sugar, or regular red and green sprinkles then bake as usual.

The colors add a little character to the cookies, but sparkling sugar in particular adds to it, giving your stars a little shine. And this kind of thins is always more fun with extra hands  🙂

3. Chocolate Covered…

Chop the chocolate then melt in the microwave or in a double boiler then dip whatever you wish in the chocolate. Besides your fingers, of course. Brownies, pretzels, any type of cookie, anything you can think of 🙂

We did oreos this year. Just set the chocolate covered tid-bit on a sheet of aluminum foil, add a tiny bit of colored sprinkles on top or whatever you want to make them pretty and resist the urge to eat them until the chocolate has become firm.

You can use chocolate that’s particularly made for candies and dipping or regular chocolate. Just make sure to leave it be until it gets nice and hard.

If your place is too warm you can even set them in the fridge, then the freezer, but they always look prettier if you let them set on their own.

4. Peppermint Shortbread

Prepare the shortbread cookies as usual using a candy cane cookie cutter to shape the cookies. Bake and allow to cool completely.

Melt some white chocolate in a double boiler, mix in red food coloring until you reach the color you desire, then add peppermint extract to taste. It shouldn’t take much, approximately 1/4 teaspoon per cup of chocolate but just add a little bit at a time until you’re happy with it.

Scoop into a bag and carefully pipe the chocolate as stripes onto the cookies. Allow the chocolate to set then enjoy.

Don’t forget to place the cookies in a pretty tin or plate. Add a bow if needed and they will be beautiful for the people you love.

Whatever you do with your Christmas cookies, have fun with it.  🙂


No Introduction Needed

November 24, 2008

Some recipes are easy to blog about. Whatever I baked just introduces itself, either because of what it is, the reason I chose to try it or whatever. These cupcakes, for some reason have been the exact opposite. I made them around June, and though they were absolutely amazing, rich, moist, chocolatey, with soft melted chocolate bottoms, I have really been drawing a blank.

I found this recipe on I Heart Cuppycakes (don’t you just love that name?) and I don’t really know what it is about these things that fascinated me so much. Wine and alcohol in general always seems to work well with chocolate, so it’s a pretty logical jump to add it to cupcakes (hell, I’ve already done it with brownies!), but even with my great lack of knowledge of wines, I just had to try this one.

I didn’t even want to wait for a real reason (a.k.a a party, a holiday, whatever) so I made these as both regular and bite-sized cupcakes, and loved them and then sat waiting for inspiration to strike so I could blog it. Well I have finally given up on the idea of a brilliant introduction, and have brushed the imaginary dust off the pictures so I can share it with all of you.

Red Wine Cupcakes
Slightly adapted from: I Heart Cuppycakes

1-1/4 cup sugar
1 cup flour
1/2 cup unsweetened cocoa powder
1 tsp baking powder
1 tsp baking soda
1/4 tsp salt
1 large egg
2/3 cup sour cream
1/4 cup vegetable oil
1/3 cup red wine
1/4 cup boiling water
1 bag of chocolate chips

Preheat oven to 350 degrees F. Line cupcake tins with papers, or grease well.

Combine sugar, flour, cocoa, baking powder, baking soda and salt together in a large bowl.

Cream the egg, sour cream, oil and wine together in mixer for two minutes. Stir in flour mixture until well combined.

Add 1/4 cup boiling water and stir. Fold in chocolate chips. Batter will be fairly thin. Pour into prepared cupcake tins and bake for approximately 17-20 minutes, or until toothpick inserted in center comes out clean.

Once they have cooled completely, cover with frosting, as desired. Enjoy!

The batter of these things was so thin that the chocolate chips all sunk to the bottom and melted, leaving a soft, creamy, amazing cupcake. It’s like having icing on the tops and bottoms! How could anyone resist that? 🙂


You Can’t Have Just One

November 19, 2008

I don’t know what it is about Oreos, but they are one of the very few things in this world that everyone seems to love. I don’t think there is a single person I know who would turn down an oreo, and you really can’t say that for any other type of store bought cookie. Even if you just like the cookies themselves, or just the cream, they bring up so many happy chocolate-crumb-and-milk-mustache memories.

Well, several months ago (even before I made homemade oreos) I was blog surfing and saw these beautiful oreo cupcakes on Epicurian Escapsim. Yes, milk’s favorite cookie is now in cupcake form, and now that I have finally tried the recipe I gotta say, it will easily become a favorite.

How can anyone resist a crumbly, chocolatey cupcake that comes with an icing so creamy, it’s almost better than dunking the cookies themselves in milk 🙂

Oreo Cupcakes
Source: Epicurian Escapsim

180g unsalted butter
400g brown sugar
250g dark chocolate
3 large eggs, separated
2 teaspoons vanilla
200g plain flour
100g self-raising flour
1 teaspoon baking powder
1 teaspoon bicarbonate of soda
8 Oreo cookies, smashed to bits
1 3/4 cup milk

Icing:

225g unsalted butter
400 – 600g icing sugar (to taste)
1/4 cup milk
2 teaspoons vanilla
3/4 cup marshmallow fluff
8 Oreo cookies, smashed to bits

Melt the chocolate in a bowl over a saucepan of simmering water. Set aside. Heat the oven to 180C and line cupcake tin with papers.

Beat the butter until it is soft, then add sugar and mix until fluffy.

Stir up the egg yolks, then add them to the butter and sugar. Add the vanilla and the chocolate.

Mix the flour, baking powder, soda in a bowl, then mix that in with the first mixture, alternating with the milk. Stir in the bashed Oreos until evenly distributed.

In a separate bowl, whip the egg whites until peaks form. Fold in the batter, mixing well.

Scoop into the cupcake liners straight away, filling them 3/4 full. Bake for 20 minutes or until tester comes out clean. Cool on a wire rack before icing.

To make the icing, beat the butter, then add in the sugar gradually and mix well. Add milk and vanilla and continue to mix. Once this much is to your taste, stir in the fluff with a spatula. Add the bashed Oreos until the texture is even. Spread or pipe on the cupcakes and enjoy! 🙂

We left the bashed oreos out of the icing, opting to place half an oreo on top, and we only used approximately 200 g of the powdered sugar, but all of those options are completely to your taste. These are oreos after all, so have fun with it!


Show Me The Chocolate!

November 18, 2008

So far I’ve tried to keep my blog strictly recipes that I’ve tried, but after being teased for several years, now that I finally made it to the Chocolate Show, I just had to share.

I don’t know why the advertising for this thing is so poor, but every year before I’ve managed to find out about the show either a week after, or just a few days before (and of course the day after I’ve hit my splurge limit for the month)

But the chocolate gods have smiled on me this year, and we were able to go this year thanks to a complete coincidence (which would take a rather rambling paragraph to explain that would simply show you how crazy I can be), and a wonderful man (the new helper I’ve mentioned a couple times recently).

Yes, that is a chocolate Obama head.

The best thing about the show was all the chocolate samples! I think every booth had different samples, and besides the shot of spicy hot chocolate (that was great until it started getting hotter and hotter). The only real disappointment (if you could call it that) was that the company we had to thank for finding the show on time, ended up being a no show. The nerve, huh? 😉

Don’t chew the truffles!

They had so many samples, they had to leave a sign so people wouldn’t eat decorations!

There were dessert wines…

And a few demonstrations…

Chocolate for every occasion…

They even had a fashion show with chocolate clothing….mess huh? 🙂

One of the great things about this show was that it introduced us to many places in New York that we never knew existed. But of course our favorite will always be Jacques Torres 🙂


Celebrating Chocolate

October 28, 2008

Here is a little riddle for you. What could be better than celebrating a birthday, whether you like birthdays or not, with a yummy cake? Celebrating National Chocolate Day! With any form of chocolate … Especially considering it comes just before the day most children get to gorge themselves on candy 🙂


I’ve always thought some of these little holidays were silly. I mean, who would want to celebrate National Rattlesnake Round Up Day? (Though National Kazoo Day is the same day…and that would be a lot more fun) But the fun of a blog is to have a great reason to celebrate this chocolatey day.

This October 28 (aka National Chocolate Day) I chose a recipe for Fudge that I have been using for many…many years thanks to my mother. It is the easiest Fudge recipe you have ever tried, and well worth it.

Chocolate Fudge

1 bag chocolate chips
1 can of sweetened-condensed milk
1 teaspoon vanilla (or 1/2 tsp vanilla 1/2 tsp chocolate liqueur)

Melt the chocolate chips in a double boiler. Remove from heat and stir in the milk and vanilla until perfectly creamy.

Line a pan with parchment or waxed paper and pour in the fudge. Let sit for several hours to set.

Once set, run a knife along the edge of the pan, turn upside down and cut into squares. Try not to eat all of it at once. Enjoy.

The hardest thing about this recipe is waiting for it to set. You can put it in the fridge if you want to munch sooner, but it really does set better if you can wait long enough for it to set on its own.

You can use any kind of chips for this recipe (milk chocolate, dark chocolate, white chocolate, peanut butter, butterscotch….) and sprinkle the top with your favorite nuts or more chocolate. Just have fun with it.  🙂